 Do you ever stare in awe at the sleek shiny horses, the glistening brass, perfect braids, and dazzling white marks at a CCI trot up? Do you ever wonder how they get that way? (LOTS of hard work is the correct answer!) Each Sunday morning we will bring you a little insider info on how the big-time grooms manage an upper level event horse. Feel free to email or comment with specific grooming questions if you have a topic in mind!
Previous entries: Weapons of War
Note: including the full list of Jog-Up topics is getting rather lengthy, so click on the “Sunday Jog-Up” category to see all entries, or use the search function on the upper toolbar.
WANTED: Your Jog-Up tips and grooming stories!! Please send me your ideas, failures, and successes so I can share them with the rest of EN! I’d love to hear any feedback, or see before/after photos of your horse. Email me at [email protected].
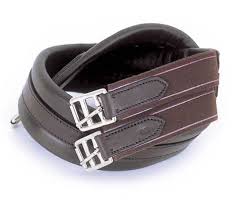
Girths
An oft-forgotten piece of equipment (both figuratively and literally…I can’t tell you how often I’ve left it at home) the girth is an extremely vital piece of equipment. Think about it– you can live with a broken stirrup leather, even a broken bridle…but a broken girth is pretty much the worst thing that could happen while riding. There are many styles of girths available, made of many different materials, but no matter what you choose, ALWAYS check the elastic and stitching at the buckles for safety.
Long girths are the traditional saddle-attachment device. They are most often seen in a shaped, chafeless style to avoid rubs at the elbows. The “overlay” girth is of the same shape, but with an extra panel of leather across the width to prevent curling at the elbows. Most of these girths have elastic at one end; it is customary to attach the girth with the elastic on the left side. If a girth has double elastic, be careful to avoid overtightening which can lead to soreness or rubs. “Anatomical” girths are also popular; they have a special carved pattern at the elbows, hopefully providing more comfort and preventing the saddle from slipping back. In my experience, the girth’s effectiveness is greatly dependent on the individual horse.
Girths are available in many other materials. String girths are helpful for some sensitive horses, and/or after body clipping. The strings allow the skin to breathe, causing less irritation. Other synthetic fabrics are available, from cloth to fleece to neoprene. Be sure that cloth girths are washed frequently, as they can become stiff and crusty with dried sweat. Neoprene girths are quite easy to care for, just hose them off after use and they will remain soft and flexible. Synthetic fleece may not be as beneficial as real shearling, but it still avoids rubs, and is immensely easier to wash, not to mention cheaper!
With the recent trend of monoflap saddles, short girths are increasingly prevalent. Like their long counterparts, you will find them in leather, cloth, fleece, and neoprene. I generally prefer synthetics over leather for a short girth– and double-end elastic as well. It seems to create more even girthing.

Short girths used to be plain, straight bands of leather– now they come in all sorts of shapes, contours, and styles. I tend to like a shaped girth, just to avoid the elbows. Other girths go to extremes with wide belly pads and fancy buckles to distribute pressure. I’m sure those things work to some degree, but in most cases I doubt the added expense is really worth it.
The average-sized long girth is a 48″ for most normal horses; short girths vary a bit more, but 26″ fits a lot of them. A long girth is “properly fitted” when you have at least two holes above and below the buckles when it is tightened. A short girth should have the buckles lie about half-way between the horse’s elbow and the lower edge of the saddle. As with the long girth, be sure you have extra holes to allow for last-minute adjustments.
The girth is only half of what holds your saddle on the horse– the other half is the actual saddle billets! Be sure the billets are in good, safe condition. Do not use any billets that are cracked, dry-rotted, or overly stretched-out. It is especially important to care for long billets– these resting right against the horse are exposed to a lot of dirt and sweat. And long billets only have two– compared to the average three on short billets– so it is extremely important to take care of them.
Overgirths
With the disappearance of the long format, overgirths aren’t quite as popular as they used to be. The risk of a billet breaking during a two-hour endurance phase, over steeplechase fences no less, was enough to see every rider using one. Now, when you’re only on the horse for 30 minutes, you have enough faith in your tack that overgirths are a bit more rare. Not to mention using them with a monoflap is a bit tricky. If you do use an overgirth (never a bad idea, at prelim and above), be sure your girth has loops sewn on to thread it through. Any saddler or bridle-repair shop can stitch them on for you. Or, if you’re in a bind (such as if one loop breaks, or is sewn too high), you can create your own loops out of electrical tape. Just wrap it three or for circuits around, doubled back on itself on the underside to prevent sticking to the overgirth. I had electrical tape loops that lasted for three seasons or more!
A common overgirth length is 80″; some horses a bit more, others a bit less. When putting the overgirth on, be sure it buckles under the horse’s belly, far away from the rider’s leg (it’s uncomfortable!). Try to keep the billet and elastic low, as well, to avoid interference with the rider’s thigh or calf. Some riders like to do up the overgirth while mounted: tighten normal girth, get on and walk around, tighten the regular girth again, then have the groom adjust the overgirth. Others, like me, tighten the regular girth, and adjust the overgirth before we get on (because we have no groom to do it for us!). An overgirth should never be tighter than your main girth– always pull it as tight as you can, and then loosen it one hole.
Other girthy notes:
When the girth is tightened, it’s a good idea to stretch the horse’s front legs forward to loosen any wrinkled skin that could become chafed.
Anytime you tighten the girth from the saddle, be careful! Put your leg forward over the flap, and try to adjust by feel, keeping your head up and alert to your surroundings. It is generally a better idea to get off and tighten a short girth from the ground, but use extreme caution when you are too lazy and decide to bend over in the saddle. For this reason, I prefer short girths with large single loops– easy to tuck in quickly– rather than individual billet keepers that you must fiddle with an instant too long when your young horse loses his patience and decides to trot off.
Tighten the girth slowly! Most horses are not “born girthy,” but rather are made that way. Poor-fitting saddles are the main cause, but cinching up roughly doesn’t do you any favors. Cold-backed horses often benefit from a short walk down the barn aisle before you tighten the girth one final time and mount .
Pony Clubbers: We’ve all heard the lecture about getting your elastic clean for formal inspections. I’ve tried pretty much all the concoctions– toothpaste (PASTE, not gel!), oxyclean, dilute bleach, Whisk, Shout, QuicSilver– you name it I’ve used it. And never been happy with the results. So what do I recommend? Go buy a girth with black or brown elastic. Even if you ONLY use it at USPC events, you will thank yourself a hundred times over. Trust me on this one!