Holly Covey photo
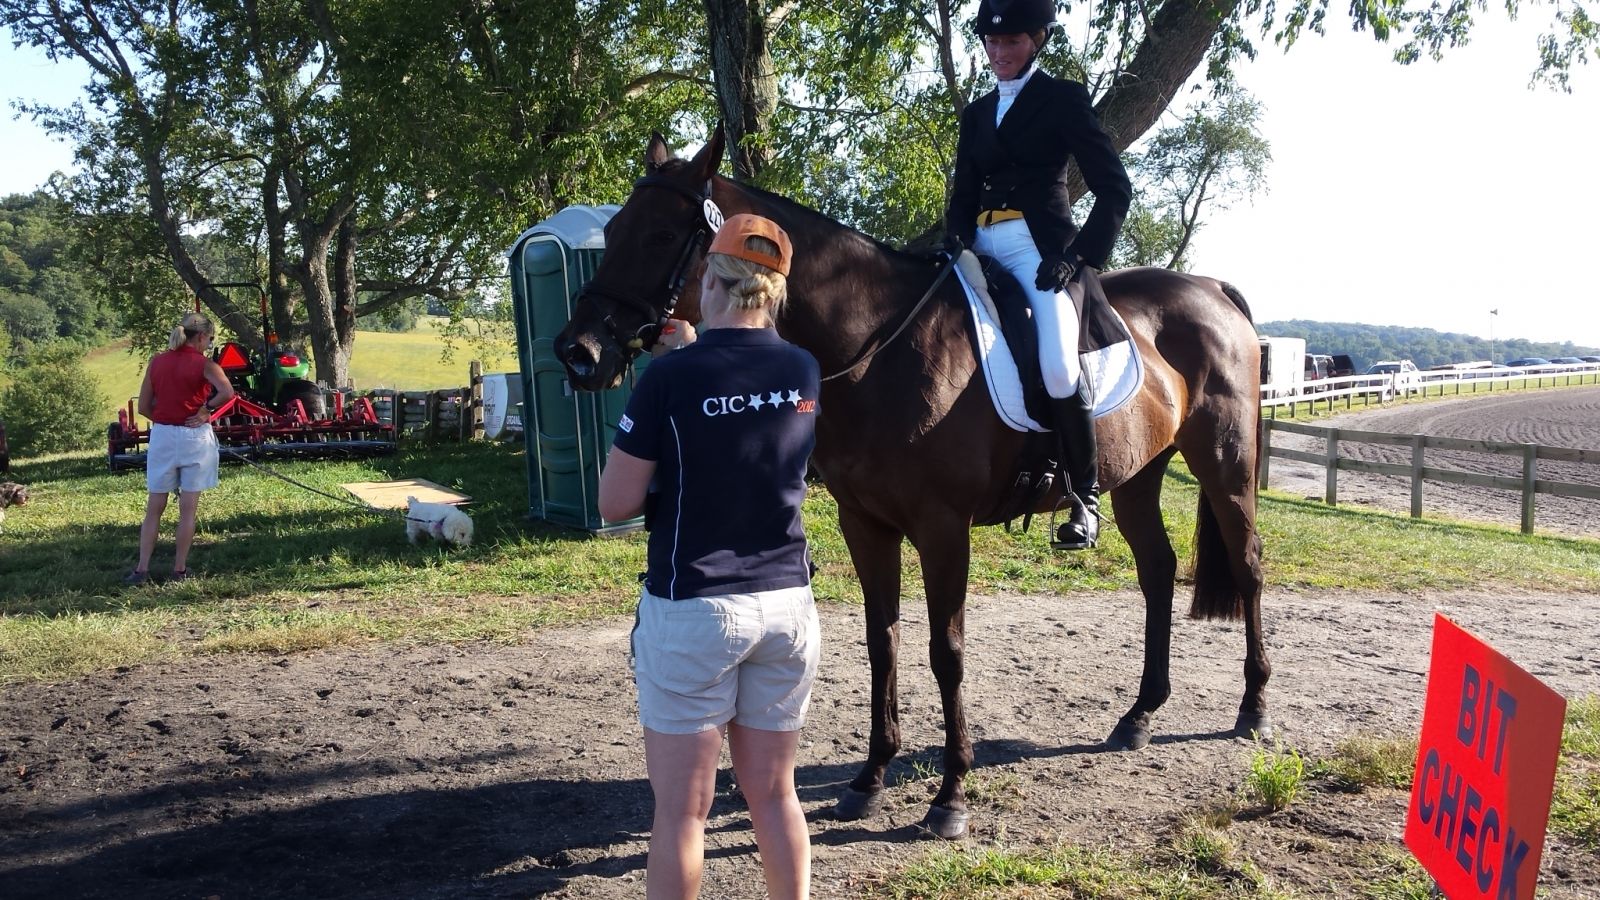
One of the most visual aspects of the eventing rule book in action is the equipment check, normally taking place at the dressage phase. The volunteer bit checker, in my opinion, is one of the most important people on the grounds of the event! And here’s why:
A bit checker is the person who is the end result of making the event fair for all competitors – the rulebook personified, if you will. This person checks that your saddlery, your spurs, and your whip are all within the rules and comply so everyone is riding with the same restrictions. That’s the technical aspect of the job. The rules about saddlery, bits, and dress are strict, and the bit/equipment check volunteer is there to keep it fair.
The bit check person is probably one of the first volunteers you’ll encounter as a rider when you get started on your warm-up for dressage, and because dressage is always our first test, the bit checker is our first volunteer interaction. How this person and you interact can set the tone for the day for both of you!
The bit checker has a dangerous, busy, intense, time sensitive and detailed job that they are primarily responsible for doing on their own, in close proximity to fit competition horses, under strict rules and guidance. While they do a necessary and important job, they don’t have jurisdiction to change the rules or even require a rider to change something in violation – they can only point it out and inform the rider and the officials. All this while staying safe, avoiding being stepped on, bit, or knocked over, and seeing that every horse is checked off a list!
So with all that, why do volunteers do it? Here’s the great side of the job: the chance to be up close to quality horses and great riders, to watch their dressage warm-up intimately, to learn all about the differences in horses, to learn about tack, to be a part of the competition as a valued member of a team, and to stretch your ability to work quietly and efficiently under pressure. There are few jobs as fun, important, and vital to an event as the bit checker!
We’ll be talking today primarily about national (USEA recognized) events.
Let’s talk about some notes for organizers as they plan their events:
Not everyone with horse experience is good at this. You have to be quiet around a horse and comfortable with strange horses other than your own, understand the necessity of using biosecurity measures, and be able to maintain a positive attitude around riders who are not always thinking about people (more like trying to remember a dressage test and avoid being bucked off in a busy warmup area!). Having said that, often some people just need a chance to do a responsible job and they shine at it.
It can be even more intense from a management standpoint if your event has multiple dressage arenas with tests going on simultaneously, which funnels competing riders in and out of the ring in quick order. For that reason, in my experience, even if your event does not have a lot of entries, a volunteer equipment checker should not be asked to be the ring steward in addition to bit checking, and they should also not be asked to do this for more than about 5-6 hours at a time.
It’s a job that should be set up as a team endeavor or with shorter, 2-3 hour shifts per person. Not only will this keep your bit checker from being completely exhausted, but will allow another person to learn the job, too.
Bit checkers must find horses as they arrive in the warm-up, speak to the rider about when they want to have the check, track when the rider goes in the competition arena and when they exit and must see that all the checking gets done for every rider. If there are multiple rings with several tests going on at the same time, this can get very hectic for your equipment person. In order to be organized and diligent, they should not be asked to steward in addition to checking equipment.

The best-looking bit check crew in the land! Photo by Leslie Wylie.
Organizing where the bit check will take place is key to having things run smoothly. Pick an area prominent to riders in warm-up, so riders and grooms cannot miss it. When possible, plan it so a rider who is exiting after their test has to pass by the bit check area. Remember, the rider has the option of presenting the horse for bit check either prior to the test, or directly after the test is performed.
It is important that for the latter reason, your event sets up at the dressage exit so that riders don’t blow off the after-test bit check. Having a string or path funneling them back to the bit check station, another steward stationed at the exit to remind them, etc. will prevent an unnecessary elimination and having your bit check volunteer chase riders around the grounds! There is nothing worse than paying a large entry fee, riding one five minute test, and then forgetting a bit check and subsequently not being allowed to jump.
Make the bit check station nice for the volunteers who have to be there. Give them a shade or rain tent and make it sturdy and large enough for several people to sit under it comfortably. Consider a cooler with ice to keep drinks and food cold, or a hot thermos of coffee or water for tea. Give them a table and chairs – this is a must. You have to be able to write on your checklist and it’s difficult to do this if you are standing and walking between horses – you can’t sit down and write in your lap or you’ll be up and down in the chair all day long. A table to write on is really important.
To include on the list of required items is a box of the disposable gloves. At the very least you will need 10 more pairs of gloves than the number of riders. Don’t forget to place a trash can or other receptacle to dispose of used gloves. It is smart to also have rubbing alcohol or alcohol gel on hand for cleaning and alcohol or anti-bacterial wipes for the spur and whip measurement tools. That’s what I expect management to provide at minimum. I’ll go over how these things should be used by a volunteer down a bit further on this page.
I always bring a few things with me in addition to what I expect the event to provide. I will bring a couple extra pens and pencils, along with sunscreen, a shade hat, bug spray, a spare rain coat if weather requires, and dress in layers. Another is a bag of candies! There is nothing quite like stopping a “concerning moment” with a nice piece of candy popped in the mouth. Prevents a lot of trouble!
Next, your bit checker needs a comprehensive list of riders – either an order of go or other type of organized list, set up on a clipboard that is also weather proof (with a plastic cover if needed). Multiple writing materials are needed. It’s a good idea to give them a list for each ring, and if you have a lot of riders and multiple rings, give them the option of a clipboard for each ring. Some will want to organize these lists in a fashion that works best for them, find out how they want to do it and help by providing copies of the proper paperwork – it’s not a bad idea to provide her with two copies, especially on rainy days. A paper list gets tattered quickly!
It should be required to have a copy of current dressage dress and saddlery rules (both national and international, if you are holding these divisions) with your bit checker’s paperwork and available at their station. Not every event does this but I wish they would. The volunteer isn’t there to give advice and the Technical Delegate can’t be everywhere, so having a printout saves a lot of angst in warmup.
For eventing bits, our USEA recognized events will be using this document, which is called USEF Eventing Annex 1. This is the most current version available.
For FEI events, see the current rules, here or through the FEI stewards at the event. (Most FEI bit checking will occur in the presence of FEI stewards, which have a more stringent protocol to follow than volunteers at national events.)
Here’s a nice description from the USDF Rules & Equipment publication:
“How to properly check Dressage bits. The process of checking bits must be done carefully and professionally. Safety, comfort, and cleanliness are all important. Ring stewards appointed by competition management must check saddlery and inspect bits and spurs on both sides of the horse …. Inspection of saddlery and bits must be done at the direction of the technical delegate. Inspection of saddlery and bits must be done immediately as the horse leaves the arena. (See DR126.1h(9))
The checking of the bridle must be done with the greatest caution, as some horses are very touchy and sensitive about their mouths. The bit inspector must use a new protective glove on each hand for each horse. New gloves should be put on each hand as the horse approaches the ring steward. The ring steward must be careful not to touch other items (radio, pen, whip, etc.) before checking the bit on each side. When communicable disease is a concern, any deviations to established saddlery inspection protocol must be approved by the USEF Dressage Department prior to the competition. Calipers or other measuring devices should be cleaned between each use with a non-caustic disinfectant. Approach the horse quietly, ALWAYS inform the rider of your intent and ask them to loosen the noseband if necessary.”
As a bit check volunteer, you will need to refresh yourself on the biosecurity of what you will be doing. Because it is necessary for you to feel the bit in the horse’s mouth, you will be touching mucous membrane with the horse’s own body fluid. In addition, in checking the rider’s spur, you’ll be in contact with the horse’s sweat from his sides that touch the spur, and whip also will be in contact with the horse’s skin. For these reasons wearing a pair of surgical-type anti-bacterial gloves is required. In many instances and in the training video above, the bit checker is only wearing one glove; however, it is proper to wear gloves on any hand that touches a horse.
It’s important to note that there are many good ways to do this job – this is only one way, that I’ve used, through several decades of experience – but there are always tips that others may have that are different, and it’s all good if it gets the job done safely.

Your finger should stay just over the bit to be safely in the bit seat of the mouth. Photo by Holly Covey
First, make sure you put on the gloves in the presence of the rider, so they can see you using a fresh, uncontaminated pair (Riders – this is important for your horse’s health – always ask to see the bit checker put on the gloves to insure it’s a clean pair for your horse.).
Next, do not touch your radio, clipboard, etc. once you are gloved. Approach the horse from the shoulder once the rider has halted the horse and settled him for you. Don’t walk to the front of the horse (he can’t see you) or reach out and grab the rein or bridle! All you have to do is approach gently from the neck/shoulder area, this helps the horse see you. Watch your feet, too, as you will be close to the front hooves and can be stepped on.
Reach gently with one gloved finger into the corner of the mouth (I use my index finger). This must be done slowly and carefully. Put your finger lightly on the bit starting at the joint of the mouthpiece and cheekpiece, then slide it in the mouth in front of the arm of the bit. If you do it this way, you will be in the safety space in the horse’s mouth where there are no teeth, (the bit seat) so you give yourself the best chance not to have your finger bitten should the horse close down.
Once you slide your finger in, keep it on the bit, quickly feel for smoothness and for the center joint, which is only in the mouth about two-and-a-half inches on 99 percent of the bits. Sometimes when you touch the corner lightly, if the noseband is loose enough, some horses will open their mouths and allow you to see the bit completely, and that’s great. Any time you do not have to touch the horse it is all good.
The object is to see that the joint and the bit arm on both sides are compliant with the rules. Your action with your finger should be a 2-3 second thing – don’t put your whole hand in there, don’t open the horse’s mouth with both hands, don’t part the lips with both hands, don’t feel around behind the bit or attempt to feel the bit with both hands. I’ve seen all of that done, and it’s unnecessary and wastes time.
Sometimes the noseband or flash strap is too tight to allow your finger to slip in next to the bit, and in that instance, you should inform the rider and request them to loosen it so you can complete your inspection. It is not generally a good idea to attempt to adjust tack yourself. Allow the rider or groom to do that for both safety and biosecurity.
With a fussy horse, ask the rider or groom, “what is the best way for me to see the bit today?”. I feel bridle removal is sort of a last resort, because it can be dangerous and compromises control of a horse in what is always a busy warmup area. Do your best to see what’s in there without necessarily getting involved personally in tack removal, and defer to the rider/groom’s wishes for safety and the comfort of the horse. They are responsible for the horse and are going to know what is best to expedite the process, and do not feel you have to handle the horse, in fact it is best not to. Occasionally you will have a very bad horse, and in that case, do let your TD know that horse was unable to let its bit be checked. All you have to do is communicate it, and go on to the next horse.
As a bit check volunteer, do your best not to touch horses unnecessarily! I love to pet horses, too, but that isn’t bio secure in this position, so be careful that you are wearing gloves on both hands as you interact with horses and riders. Caution your fellow stewards also to be keeping a respectful distance from the horses and not touching them unless it is absolutely necessary.
After you check a horse’s bit, it is a good idea to check the rider’s spurs on both sides and the whip with the same set of gloves, then discard them after every horse in your trash container by pulling them inside-out as you remove them. You can then wipe off your measuring devices between horses too before you touch your clipboard, pen, or radio. Generally I use my alcohol gel about every 10 or 15 horses on my bare hands just to be sure I am staying clean, and if I’m in short sleeves I will do my forearms as well.

From the USEA Volunteer Video, “Dressage Bit Check”.
With regard to hoods and bonnets, the rule has changed since the video was made. We no longer need to check the hoods for compliance, but we still must check for ear plugs, which are illegal. Riders must remove the bonnet/hood in your presence so you can see if the ears are not plugged. This must be done while you are there and not before you are available to see it removed. You no longer need to feel the bonnet, just check the horse’s ears visually.
We’ve covered most of the equipment checking that a bit check volunteer will do, but there are a couple of things you should know. When you measure spurs, it is important to measure the length of the spur from the boot heel out to the end of the spur (This differs from USDF rules). In eventing we measure from the boot, and your measuring device – some people use a U-shaped measurement cutout – has be be able to be placed against the boot heel vertically in order to have an accurate measurement of the shank. Two inches is too large!

Measure from the heel. photo by Holly Covey
If a spur is too long, I always measure it twice and measure the rider’s left and right spurs to see if perhaps they just made a mistake and grabbed the wrong one. It happens!
The last time I checked equipment at a large horse trial, we found quite a few spurs to be outside the 4cm window, so some manufacturers are making non-compliant spurs. Bear in mind this rule is for ALL phases of eventing, not just the dressage, so if you find a set of spurs that is illegal in the dressage bit check, they can’t continue with them in other phases – or face penalty of elimination. And the old “business card” measurement is not compliant!

Business card measurement: too big! 4 cm is the allowed length. photo by Holly Covey
Here’s the USEA rule about spurs:
4. SPURS. a. Spurs are optional for all three tests. Spurs capable of wounding a horse are forbidden. Spurs must be of smooth metal. If there is a shank it must not be longer than 4 cm (1 9/16 inches, measured from the boot to the end of the spur) and must point only towards the rear. If the shank is curved, the spurs must be worn only with the shank directed downwards. Metal or plastic spurs with round hard plastic or metal knobs “Impulse spurs” and “Dummy spurs” with no shank are allowed. b. Rowel spurs – Spurs with rowels are allowed in the three Tests and when practicing/warming up. If they are used, rowels must be free to rotate and the rowel must be round and smooth (no tines allowed).
You will also be charged with checking whips. Here’s the USEA rule about whips:
3. WHIPS. One whip no longer than 120 cm (47.2 in) including lash may be carried when riding on the flat at any time. One whip no longer than 120 cm (47.2 in) may be carried during the Dressage Test except in USEF/USEA Championships and USEA Championship divisions. As an exception, riders competing sidesaddle may carry a whip in the dressage test at all competitions, including championships. A standard lunge whip may be used when lunging a horse. If a whip is carried in the Cross-Country and/or Jumping Test, or while jumping any obstacle before these tests, it must not be weighted at the end or exceed 75cm (30”) in length. An adjustable-length whip may not be carried by a mounted rider.
In checking dressage whip length, it’s often not comfortable to the horse to hold up a measuring stick to the rider as they stand mounted. So I learned a little trick from the best in the business: using a second whip that is maximum length; this saves time walking a whip back and forth to a measurement device, too. Simply hold the riders whip next to your maximum whip (which you can tie a pink ribbon on, or mark in some way) and you can see if its compliant right there next to the horse. They are usually are better with this than with a measuring stick being held next to them.
It is important to read EV115 about the rules regarding saddlery at USEA events – not just dressage but for all phases. Is it legal to see a wrapped bit? Yes. Are bit guards legal? No. Is a nose net legal? Yes, with a few requirements. Can a dressage rider have a neck strap? Yes, but it has to be leather and can’t be colored vinyl strap or a belt! Is there a difference between championship dressage and a regular dressage test with regard to equipment? Yes, there is a difference; whips are NOT allowed in a championship test! Can a bonnet be tied down to the noseband? No. All these little things and more are in the rules and it’s always good to refresh your memory. I download the latest copy onto my phone usually the night before I am to work.
You will run into some unusual things – nosebands or bridles that look like something out of Star Wars, bits with funny looking rings, etc. Check your rules, then call your TD; they have seen almost everything, and will be able to reassure you that it is OK, or will want to see it. If that is the case, pull out your phone, snap a photo, and text it to your TD or official – it may save several minutes especially if they are on the other side of the grounds. This is a quick way to get an “ok” and keep things running smoothly. It’s a good idea to trade phone numbers first thing in the morning when you arrive!
If you do see something unusual, the next thing you will hear is the classic, “but the Bit Check OK’d it last week at ABC Horse Trials”. Be cautious about allowing the rider, trainer or coach to answer your question for you. Your TD or ground jury will be happy to answer your question, no matter how trivial it might seem or even if everyone within 50 feet is telling you you are wrong.
Bit checking is just one volunteer job that needs a well trained person! Photo by Holly Covey
We all have access to the same rulebook, but honestly my memory sure isn’t what it once was, and we all make mistakes. And it would be more courteous of a rider addressing a volunteer in this position to say, “I’ve used this before and they did find it within the rules, but I’d be happy to reassure you by chatting with the TD to be sure it is compliant today.”
Remember to be neutral and businesslike when finding a violation. It is often just an honest mistake, and most riders will comply, or it’s an allowed piece of equipment that the TD knows about but isn’t in the rules so you can be aware of it. Always let the technical delegate or official handle these sorts of issues, and most of the time things will be resolved in a fair and positive manner. And that is the time when the candy is useful!