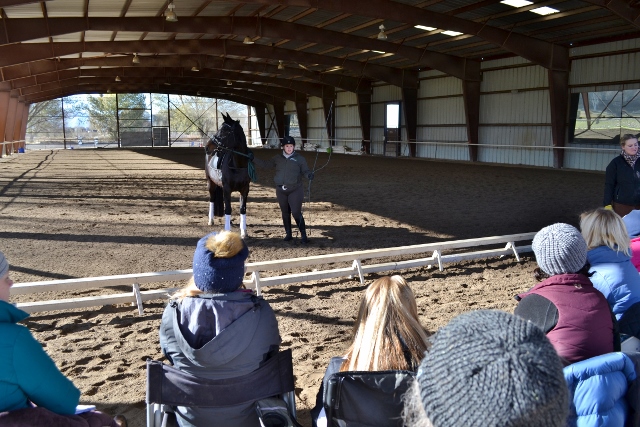
Sarah Geikie lunges demo rider Jamie Ringger at the USDF Instructor Certification Clinic. Photo by Lorraine Jackson.
Sarah Geikie may be a revered dressage teacher now, but her eventing accolades are nothing to sniff at either. After earning her USPC “B” rating, competing up to Preliminary Level and getting a degree in Animal Science at the University of Massachusetts, Sarah went on to coach two North American Junior & Young Rider Championships eventing teams to silver medals and served as the director of Equestrian Studies at her alma mater.
It was around this time that Sarah turned her focus completely to dressage, and she has instructed numerous riders since throughout North America. She is an FEI**** (C) Judge and a faculty member of the United States Dressage Federation. It is in this capacity that she came to teach a two-day lunging clinic in Spanish Fork, Utah, as part of the USDF’s Instructor Certification Program.
“Anyone can hang up their shingle and call themselves a dressage trainer,” Stacey Hornsby of the Utah Dressage Society told EN. “But (the instructor certification program) allows us to set some standards and expectations, which really just improves the whole sport in the region.”
The lunging clinic is one of several sessions throughout the year to prepare an instructor for the certification test in the spring, but there were myriad golden nuggets of information for anyone who regularly lunges their horse as part of a training regimen.

Instructor Leah Nelson, left, and Sarah Geikie inspect the equipment before a lunging session. Photo by Lorraine Jackson.
Getting Started: Proper Equipment
Sarah repeatedly mentioned, “An instructor’s first goal is safety for the horse and rider, and secondly to be effective.”
An initial lecture with USDF video demos set the standard for safe equipment: It showed several examples of safe lunge line attachments, running a surcingle over the saddle or without a saddle, and proper stowing of the stirrups and reins. (You can access all the USDF training videos if you’re a current member.)
Other equipment tips:
- Saddle fit is critical to all work, including lunging. The saddle should have good clearance of the withers and shoulder, and distribute the pressure evenly in the flaps. A good saddle fitter should be consulted two to three times a year as the horse’s body changes.
- Lunge all horses in polo wraps or boots on all four legs.
- “Lunging without side reins is a complete waste of your time.”
- Err toward starting with side reins too long and shorten as you go, rather than adjusting too short and shutting down the proper position or upsetting the horse.
- Always attach/adjust the outside side rein first and inside rein last, so as soon as you finish the inside side rein you can immediately send the horse away instead of crossing in front and then sending.
- You should change direction often in lunging, which can be a pain, so use tack adjustments as an opportunity to change directions. Never go longer than five to six minutes on one side.
- Every horse and set of equipment, regardless of whether they’re familiar to you or not, gets a full initial safety check and once over.

Instructor Annie Sweet analyzes the movement of an older Morgan mare during her session. Photo by Lorraine Jackson.
Horse Assessment
Each instructor was expected to be able to assess the horse’s readiness to begin the lesson, explore their abilities and weaknesses, and then make an action plan for the remainder of the session to help the horse make genuine improvements according to their level.
Steps for Proper Assessment:
- OBSERVE: Before you begin to lunge, move the lunge whip over the horse’s body and evaluate the horse’s personality, temperament, sensitivity and “buy-in” that day. “We want to explore how they react, or don’t react,” says Sarah. You can ask for some turns on the forehand and a little lateral motion. This has the added benefit of teaching the horse something about you, too.
- ANALYZE: Assess the horse’s conformation and determine what physiology you’ll be working with and what weaknesses you may be trying to overcome.
- Lunge the horse at all three gaits in both directions and determine his status in the training pyramid. (Rhythm, Relaxation, Connection, Impulsion, Straightness and Collection)
- While the emphasis could vary greatly throughout the day, as we saw horses training level to 4th level, each instructor was expected to be able to determine a stiff and hollow side, the horse’s emotional and physical suppleness and relaxation, whether the horse was forward and in front of the aids, and where the horse was struggling with connection and balance.
- PLAN: Address weaknesses and build on areas of strength. Determine what tools (literally and figuratively) you will need to help the horse succeed.
Instructor Sydni Otteson shares her action plan with the group before implementation. Photo by Lorraine Jackson.
Implementation
This is the final step in a training session — to use your newfound information and plan to actually see that the horse improves in some way each and every session.
There were several critical themes throughout the day that affected nearly every horse and instructor:
- Encouraging the horse to be mentally and physically supple enough to accept the aids
- Helping the horse stay OUT on the 20-meter circle and use the contact of the lunge line and side reins to find balance
- Building even strength, elasticity and acceptance to minimize the natural stiff/hollow side that every horse (and rider) naturally possesses.
There were several exercises used by the instructors, including decreasing and increasing the size of the circle, asking for several transitions, and perfecting the use of the half-halt. All of these exercises can infuse forward thinking and forward energy, while the side reins and lunge line offer consistency and a place for the horse to find its rhythm and establish full physiological connection and balance.
Several Other Good Notes from the Day
A word on transitions: A good half halt associated with the vocal cue of “and” helps a horse prepare and have a successful upward or downward transition. “And (half halt) trot (upward cue).”
On half halts on the lunge: These are very similar to how you’d perform it in the saddle, as are most things about lunging, it turns out. Engage and tighten your core, close the hand and sense the tension in the rein, and then SOFTEN. Like under saddle, the half halt is critical to successful forwardness, both in mind and in body. “We must realize that ‘forward’ is a state of mind for the horse,” Sarah reminds us.

Instructor Leah Nelson gets feedback as she lunges Crosby, a 10-year-old warmblood. Photo by Lorraine Jackson.
On lunger position: This really can’t be stressed enough and was a tremendously helpful theme for the whole day: Your lunging position reflects your riding position. Your hips should face your horse in the “pie wedge,” your hands should be soft but ready, your elbows should be in and near your hips, your thumbs should be up, and your feet should be a guide (in this case, with one foot firmly planted) to build good geometry.
A dependable circle is CRITICAL to the horse being able to find its balance and build consistency in its frame and tempo.
On horse experience: The clinic included horses from Training level to 4th level, and there was some tendency at first to have the same lunging expectations for any horse at the lunge, which Sarah quickly addressed. “Use the training the horse knows to help improve things.” If the horse is riding in a 4th-level frame, they should be able to lunge in the 4th-level frame.
On suppling a stiff side: As we try to supple a horse on the stiff side, we are looking for the following cues that the horse is softening:
- Inside hind leg is stepping under the horse’s center of gravity
- Outside shoulder is coming in and down toward the inside
- Poll, eye and mouth are subtly facing inward, not cranked inward
Also, while one side may be stiffer, you should not work suppling more in one direction than the other. All exercises should be done evenly in both directions to build even muscle and support.
Final Thoughts on the Clinic
The lunging clinic was an invaluable opportunity not only to start thinking about how we can make a lunging curriculum for our own horses, but also to see the rising instructor talent in the region and understand the expectations for certification. USEF is exploring USDF’s certification as a pilot program for other disciplines, and these pre-certification workshops are an illuminating picture into what could be the future of eventing instruction as well.
Many thanks to the Utah Dressage Society, Zephyr Ranch, and the USDF Instructor Certification Program for inviting EN to attend.