Do you ever stare in awe at the sleek shiny horses, the glistening brass, perfect braids, and dazzling white marks at a CCI trot up? Do you ever wonder how they get that way? (LOTS of hard work is the correct answer!) Each Sunday morning we will bring you a little insider info on how the big-time grooms manage an upper level event horse. Feel free to email or comment with specific grooming questions if you have a topic in mind!
Previous entries: Extreme Makeover: Mane Event
What About Tack? Part I , Part II
Phase 2: Taming the Tail


This is Week 2 of a month-long project in which I will turn an average, “backyard” horse into a creature of beauty. Or at least, that’s the plan. I considered using a horse that already looks good, but where’s the fun in that? I think it’s a better learning experience to start with an “ugly duckling” and turn him into a lovely swan. I’ve broken the transformation down into four phases, with a new procedure presented each week.
Phase 1: Mane
Phase 2: Tail
Phase 3: Braids
Phase 4: Finishing touches, including quarter marks.
My innocent victim eager test subject is “Benny,” a six-year-old OTTB. Benny sustained a suspensory injury last spring, retired from the track, and hasn’t done much in the last year except sit in a field and beat up his pasture mates. He’s lives out 24/7, is healthy and well-fed, but hasn’t seen a brush or comb until recently. The change is dramatic!


PHASE 2: TAMING THE TAIL
When Benny arrived almost a year ago, his tail was nothing special. Kinda ratty, a little wispy, falling somewhere below his hocks. After eleven months of neglect, it grew to a nice thickness, with the longest strands all the way down to his pasterns. I am a BIG believer in “leave that tail alone.” Daily attention does more harm than good. I only mess with tails for shows, or if they become entangled with burrs. If you want a nice, thick tail… ignore it! (note: tail bags are another segment entirely– I have used them successfully, but only in necessary situations, like grays).
Also, come to terms with the fact that your horse has a limit to what his tail will be– it’s called “genetic potential,” and nothing you do can give a rat-tailed Appy the double-thick tail of a draft cross. There is no magic potion or secret procedure to produce instant results, short of a fake tail (eww). Sometimes you just have to accept that your horse has a bad tail, and learn to appreciate it for what it is. But that doesn’t mean you won’t stare jealously at your friend’s horse’s luscious tail, as she hacks at it with a brush ripping out handfulls, and the thing is so long and full no one can notice. Meanwhile, you can still obsess (I mean, lovingly cherish every single hair) over your horse’s tail to make it all that it can be.
Benny’s tail treatment began with a thorough washing. Before you wet it down, shake out any bedding or foreign material. As a rule, I use dish soap for all my equine washing needs, unless a particular situation (skin disease, whiteness) dictates otherwise. Tails can be tough to lather, but the dish soap is cheap so use it generously. Scrub the tailbone to remove any loose skin or dandruff. Rinse well, especially around the dock (dried soap can be itchy). Unless I’m washing the tail every day (sigh, gray mares), I follow up the shampooing with a conditioner. Anything on sale, cheap, will work. Apple-scented? Sure. Squirt a ribbon of conditioner down the length of the tail, below the tailbone, and work it in well. Leave it on for a few minutes (I like to use this time to scrub the horse’s face, or white socks), and rinse again.
The conditioning step is optional, but it seems to help offset the drying effect of washing. After the tail is clean and conditioned, towel it dry and spray liberally with Showsheen. Lots of Showsheen, lots and lots on the skirt of the tail (not on the upper tailbone). I don’t use it daily, only after show baths, so I don’t feel guilty about “residue buildup” or any of that. When you have a neglected tail full of tangles, you need all the help you can get! Now, let the tail DRY COMPLETELY.
Don’t even bother trying to untangle a wet tail. When damp, the hair tends to clump together and individual strands become stretchy, but fragile. Surely you have something else to do (braid? clean tack?) while the tail returns to its normal dry characteristics.
OK, so the tail is dry. Get the brush and have at it, right? WRONG! Pick through the tail by hand, strand-by-strand as necessary. Brushes and combs will rip hair out, even if you’re careful. But using your fingers, you can work through the whole tail without damaging a single hair. It can take a while, but you will see the results over time. I like to squeeze a bit of Cowboy Magic on my fingers, and distribute it throughout the tail as I go. It helps the tangles slip out, and adds a nice shine.
How do I hand-pick a tail? Hold all of it in one hand, let’s say your left. Squeeze a bit of Cowboy Magic on to your thumb/index/middle fingers of both hands. Starting at the top, use the fingers on your right hand to separate strands of hair from the whole tail in your left. Pull the entire strand of hair free from your left hand, and let it fall freely. Switch hands to switch sides; the untangled hair hangs down freely, the tangled mess remains held in one hand. Work down the tailbone, gently separating tangles as they occur. Picking through the tail often makes it look a bit fuller, as well as saving every precious strand. Once it is completely tangle-free, you may then comb or brush it gently (start from the bottom) to smooth it out.

(note: you probably shouldn’t stand directly behind the horse;
I had to move over to get better light for the photos)
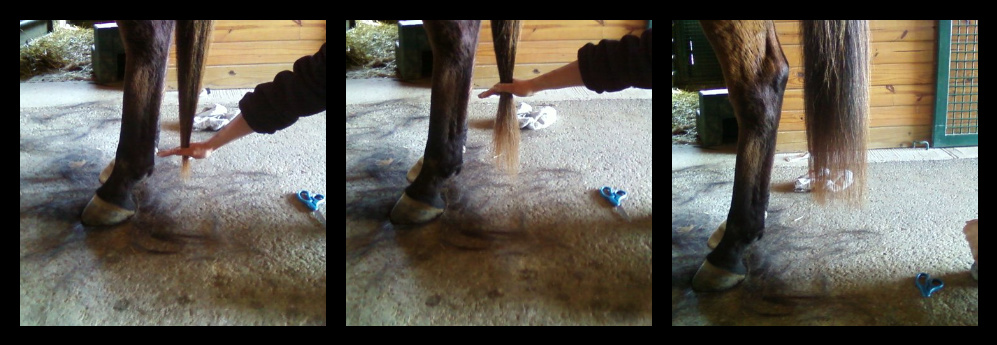
1. Near the fetlocks is where I 2. Some people go higher, a 3. Benny’s is about halfway
like to cut it. hands-width below the hocks. in between.
Pulling the Tail
Most (I daresay all) upper level horses have a “manicured” dock, pulled or trimmed along the sides to enhance the hindquarters. It is most traditional, and in my opinion much better, to pull the tail instead of shaving it with clippers. I hate hate hate shaved tails– most of them look like bushy toilet brushes. And they grow out to be even worse! Once you clip, you ALWAYS have to clip…trying to pull a clipped tail is incredibly difficult and really not fun. I have seen only about 5 shaved tails in my lifetime that were a visual improvement over a natural tail. If the horse simply WILL NOT tolerate pulling, I leave the tail alone or (if you hold a gun to my head) braid it. Also, there are some horses that simply DO NOT look good with a pulled tail– my old one-star horse has a very fat, wide tailbone and looks really silly without full hair.
Since pulling is a tedious process, and requires upkeep, I generally don’t bother with it until the horse is going Prelim. Why? 1. Lower-level horses may not have much “hindquarters” to show off, and 2. there’s only so much time available and I’d rather spend it on the upper level horses. When I do have the time, I do like to put in the effort for any horse to make him look better. Most pulled tails will need a little “touching up” pulling once a month, or before events– pull anything that sticks out obtrusively, or longer than an inch or so.
Now, the actual pulling process. First, you must envision what your final result will look like: picture the tail as a long, skinny box. You will be pulling the sides of the box, NOT the top. The actual length and shape will be determined by your horse’s conformation; it should taper off and end somewhere below the point of buttock when viewed from the side. Viewed from behind, it may have a slight hourglass shape, following the contour of the butt cheeks.
With a mental image in mind, begin pulling (again, I like to use latex gloves for grip). Hold the tailbone with one hand, and pull with the other. Take only a few hairs at a time, and stand to the side as the horse may kick! Usually they don’t blast you with the first tug; they’ll get antsy, dancing sideways, and flinching as you continue to pull…those are your warning signs! My mare is a kicker (it’s her default pissed-off response to anything in general), but she tolerates the pulling process just fine. I will give a firm slap if the horse threatens to kick and lifts a hind foot in my direction. Often, the horse settles a bit as you go; the nerves dull a bit and the horse gets used to it. Benny minded the mane pulling a lot more than his tail. Some horses will not stand to do the whole tail at once– that’s fine, work on it a little each day, or every other day as you can. It may help to have someone hold the horse, distract it with food/hay, or resort to a twitch if necessary.
Work down both sides as you go, checking often to keep the sides evenly matched. Switch hands or take breaks when you get tired or weak-fingered. Sometimes wetting your fingers (spit on them) gives extra grip if you find the hair slippery. I find that horses seem to appreciate working quickly, in a fast rhythm. It’s sort of like pulling a bandaid off– rip it quick and it’s less painful than peeling it back slowly. Speaking of bandaids… you will probably notice the dock bleeding a little from the missing hair. This is normal. It’s not pleasant, but it’s part of the process. Don’t worry about it; manes bleed too, you just don’t notice it as much.
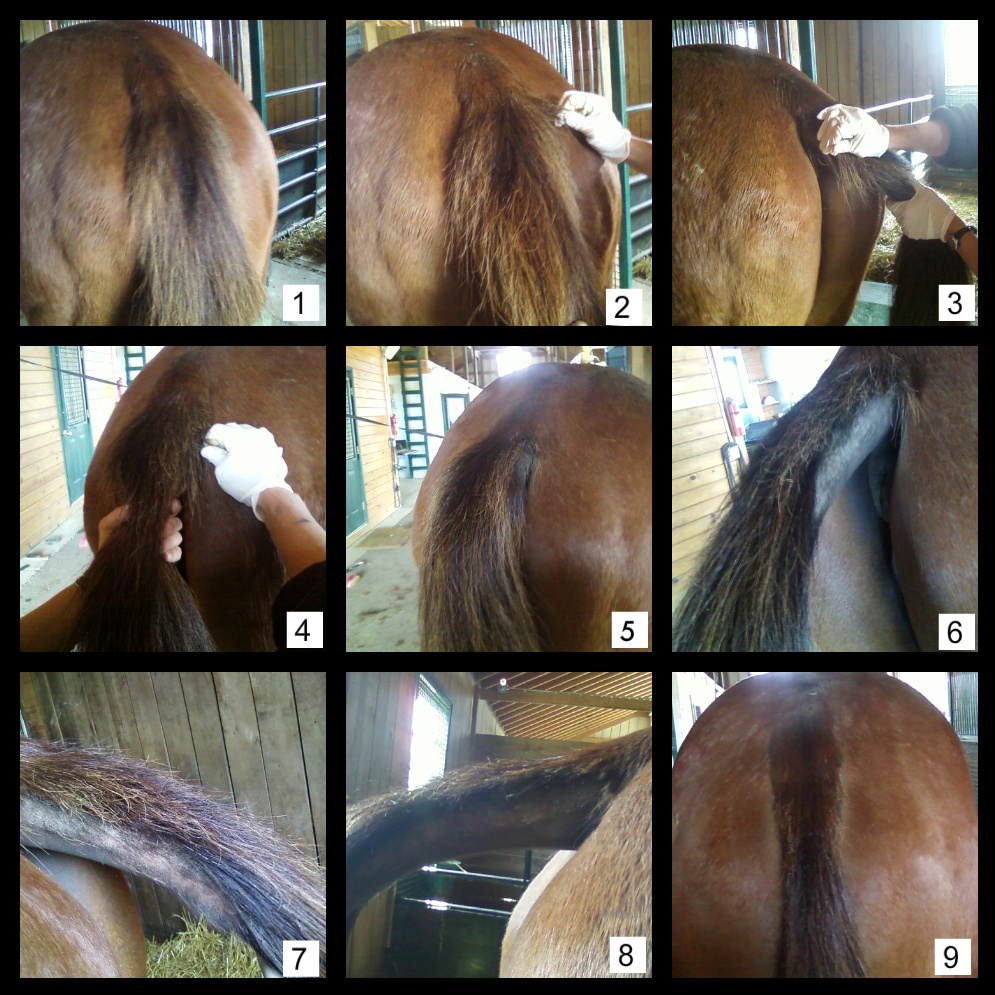
1. The bushy, unpulled tail.
2. Stand off to the side and take only a few hairs!
3. Hold the tail with one hand, work both sides evenly.
4. Work in small sections beginning at the top.
5. See the section missing? Progress in small steps.
6. The section is getting bigger, nearly halfway done.
7. Checking the other side to see if it’s even.
8. Nearly finished, from the side. Yes, it’s bald!
9. Finished tail, from the rear. Looks great!
Notice in these photos, how the tail is being contoured to complement Benny’s hindquarters:


You probably noticed that the tail is BALD along the sides. This is not the finished product, but it is your goal after Day 1. Over the next couple weeks, the hair will regrow and fill in neatly, and will have the appearance you are accustomed to seeing at shows. During the regrowing process, it helps to keep the tail bandaged as much as possible (several hours a day while the horse is stalled). Keeping a wrap on it will train the hair to grow smoothly down the bone, instead of straight out bushy. Even just wrapping the tail while you groom every day helps a little bit. Also, wrap while trailering, and for about an hour before you compete at shows to lay the hair properly. Use an Ace bandage, knitted track wrap, or specific “tail bandage” if you prefer. I know Pony Club has reservations about Ace bandages (they stretch too much), but they are extremely common and are preferred by almost everybody. If it doesn’t have velcro, tie a knot in one end. You can dunk it in a water bucket to dampen it, which helps train the hair and help grip a little. Be very careful not to wrap too tightly! New bandages, especially, are easy to over-stretch, so use them delicately. If you notice the horse rubbing his tail wrap, loosen it! It’s far better to have the wrap fall off, than for the horse to lose circulation (and possibly all his hair!) in his tail.

To wrap the tail:
1. Throw it over your shoulder, and begin the bandage with a couple wraps at the very tip top.
2. You can keep wrapping straight down, overlapping about 2/3 width. Or, as in the photo, use a crossing/herringbone pattern: one wrap down, one wrap angled up, to help prevent the bandage from slipping down.
3. Secure it by velcro-ing, or tucking the knotted-end under a layer. Be sure to finish on the top of the tail, not underneath or on the sides– that would be uncomfortable!
4. The finished wrap.
5. The wrap should extend down the tailbone beyond the pulled portion.
My helper and I were simply shocked at Benny’s transformation when his tail was finished. We stood back, looked at each other, and she said, “OMG, Benny has a BUTT!!” It really did accentuate his hind end, and make his whole appearance more polished. This is one instance where you can say with a happy smile, “it really DOES make his butt look big!”