AJ Dyer
Articles Written 1,534
Article Views 1,536,939

AJ Dyer

Achievements

Become an Eventing Nation Blogger

About AJ Dyer

Visionaire is one of the foundation writers of Eventing Nation from the very early days in 2010. She has ridden up to Advanced level and spent six years as head groom for Dorothy Crowell. After a few years in the Thoroughbred industry, she now spends her time writing for EN, riding a few nice OTTBs, and working with her husband's hay business, A.T. Acres Farm.

Latest Articles Written

Lower-Level Event Rider Profile

I was in Chattahoochee this past weekend when the latest edition of LLRP was published.  As usual, I received several more Rider Profile emails in response.  I usually store them, and try to post them in the general order they are received.  But I made an exception for this one, and bumped it straight to the top.  I think you will enjoy it, and appreciate the perspective.  Kate, thanks for reminding us that there are things more important than eventing competition.  We at Eventing Nation would like to thank all the men and women who devote themselves to serving our country.  Kick on!!

FEATURED RIDER:


Name: Kate Rhine

Age: 24

Location: Franklin, VA (although serving in Iraq right now)

Primary horse’s name: Pepperbox.  And an unnamed foal by Cicera’s Icewater

Age, breed, pertinent info:

Pepperbox- an 11 year old 17.1 hand thoroughbred gelding who I was lucky enough to get the opportunity to own, he has evented through Prelim without ever having a stop. He was injured two years ago and also had some behavioral problems that often involved his rider meeting the ground so his owner was looking for a new home for him, somebody who would give him a second chance. I did, and now he has remembered his manners, is fully recovered from his injury and is ready to start eventing again! I also have a foal who is due to be born any day! He is out of a lovely oldenburg mare and by the stallion Cicera’s Icewater.

Level currently competing:

Currently taking a year off, I’m serving in Iraq with the 229th Military Police Company, we are due to head home in July. I have competed sucessfully though Prelim.


Short term goals this spring/summer:

To get Pepperbox eventing fit again and hopefully finish the year w/ a few events at a level he is comfortable with.

Year-end goals:

I’m hoping to finish the year at training level if he is ok with it and take the winter to prepare him for the 2011 seaason.


Overall goals?

The same as it has been since I was about 12, to ride succesfully at Advanced. 🙂 In the meantime to just continue learning and growing in my riding and passing on things I have learned to my students. I enjoy helping my students reach their goals, watching them improve and most importantly have a passion for their horses and loving this sport.

What’s the best thing you’ve learned recently?

To appreciate everything you have, to enjoy your horse and the journey. Being in Iraq has taught me to enjoy the little things, when I was younger I was more focused on competing and getting to the next level. Now I’m just looking forward to learning, improving my riding and just enjoying my horses!

Favorite eventing moment/story?  (can be anything, something you did, felt, witnessed, realized…?)

The day I completed my first Prelim at Waredaca on a young (just turned 6) brilliant mare that I had brought along from a total greenie, she ROCKED on the cross country course and we just had a blast. I remember thinking “wow, this is what its all about, all the hard work, the money and the time, its just me and my horse eating up this course! What a rush!” she was amazing at that event and at the others we completed.


Website:  www.rhineequestrian.com

The Sunday Jog-Up: Tips from a Groom

RadnorJog3-1.jpg Do you ever stare in awe at the sleek shiny horses, the glistening brass, perfect braids, and dazzling white marks at a CCI trot up?  Do you ever wonder how they get that way?  (LOTS of hard work is the correct answer!)  Each Sunday morning we will bring you a little insider info on how the big-time grooms manage an upper level event horse.  Feel free to email or comment with specific grooming questions if you have a topic in mind!

Previous entries:  Sheath Cleaning

Quarter Marks

Extreme Makeover: Button Braids , Part II 

Extreme Makeover: Taming the Tail

Extreme Makeover: Mane Event

                          Shank You Very Much

                          Organizational Skills 

                          Know Your Rules

                          Safety First  

                          Odds & Ends

                          What About Tack? Part I , Part II

                          Shining, Shimmering, Splendid

                          A Close Shave

                          Get those white legs white!

STUDS

FILE0853.JPG

No, I’m not talking about “studs” of the breeding variety.  I’m talking about those little scraps of metal that you twist into the heel of a horse’s shoe to provide added traction on a variety of surfaces. 

When to use studs?
Whenever you feel like there is a possibility your horse might slip, you should use studs.  This “possibility” is affected by footing, level of jumping, and the individual horse.  Ground conditions range from hard and slick to deep and boggy.  Different studs are used for different footings. 

At lower levels (BN, N) studs often aren’t necessary.  The slower speed, lower height, and lack of technicality (few sharp turns) mean that there is more room for error, and a horse doesn’t need maximum power to complete the question safely.  Studs allow the horse to transfer more of his jumping effort into “UP” over the fence, instead of sliding his feet in the opposite direction…this becomes increasingly important at preliminary level and above.

Use of studs is also dependent on the individual horse.  Some quick, catty horses are more surefooted than half-draft plodders (NO OFFENSE to drafties, I love them!).  But some quick, catty horses turn too fast for their own good and “spin their wheels,” so studs can help.  Horses with excellent feet, happily barefoot at Novice level, should probably stay that way.  Bare feet provide better traction than plain flat shoes… but shoes with studs are better than bare feet.

I generally start using studs at Training level, but it is always dependent on the horse, and what area you live in.  Lovely sandy footing like Ocala and Aiken does not require studs like those in clay-based locales.

What studs to use?
This is a very complex question.  You really must KNOW the ground, and KNOW your horse to answer it…and it is highly individual.  There is no true “right” answer, no mathematical formula that will produce the perfect result.  It is a “feel” you will develop over time, riding many courses and knowing your horse.  It is good, though, to take a peek at what others are using.  Saturday morning, you will frequently find less-experienced riders scampering amongst the barn area, carrying stud kits, or a handful of studs, getting ideas or confirmation from neighbors about “What are you using??  What do you think about This One??”  Working for an upper level rider, I fielded such questions frequently: brought them into the stall, picked up a studded foot and explained what and why.

General rules
There are a few general principles to follow, tailor them as you may to suit your needs.

— Use the smallest studs possible to get the job done.  By increasing traction, studs also increase the torque placed on the horse’s limbs.  Bigger studs = more torque.  More torque leads to greater strain on the leg, and risk of injury.  When a horse lands off a big jump, the front feet slide just a little…this is desirable.  When the horse doesn’t slide, but jams into the ground like a lawn dart, that’s when things go “pop.”  Think of an NFL running back making a cut with the ball, avoiding a defender.  He needs to push off with one foot; that foot must not slip too much or he’ll fall down.  But if the foot excessively “plants” in the turf, he can blow out a knee. 

Smaller studs in front; bigger studs in back.  The horse’s jumping power comes from the rear, like a drag racing car.  Dragsters have HUGE rear tires to maximize traction, but smaller front wheels for direction only.  Same idea applies… use smaller studs in front to limit torque to limbs, but keep larger ones behind to maximize power.

–Bigger studs on outside, smaller studs on inside.  This rule can be optional; there are many who believe in equal studding on the same foot.  However, I was taught to use the taller, spikier stud on the outside branch, and a shorter/duller stud on the inside branch.  The idea is that if a horse steps on himself, or strikes the opposing leg, it won’t get ripped to shreds by a big honkin’ pointy stud.  “But, but, but, it’s UNEVEN!!” people always say when they see my horse standing on a hard, flat surface.  Yes, but my horse isn’t competing on pavement– on turf, both studs will sink into the ground, allowing her foot to land level and balanced.  The outer stud is the more important one anyway– that’s your “rudder” stud to help the horse turn.  If you’re in a massive hurry to tack up, and the ground is decent, you can get away with just throwing in one grass tip stud on the outside branch of each foot.  You’ll survive a lower level course, jump lesson, or show jumping round just fine without the inner studs.  In some instances, as with duller studs on yielding ground, I will use the same stud “straight across” the shoe (both branches) or “all-around” (meaning all 4 feet straight across). 

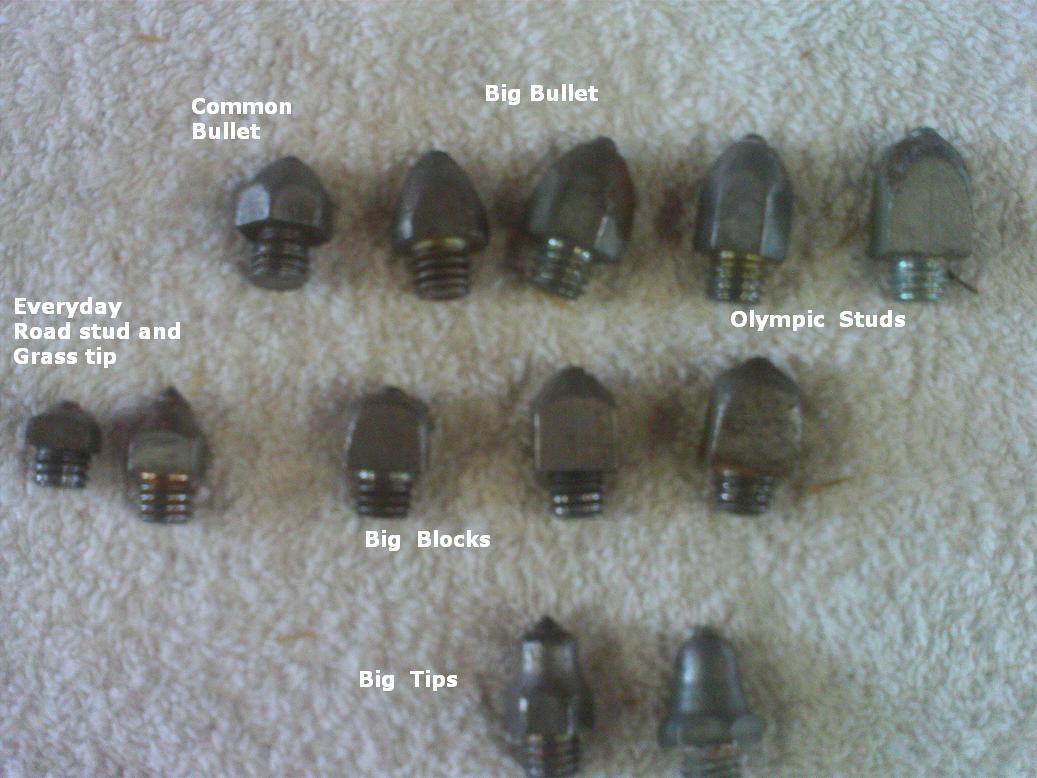
Stud Taxonomy and Nomenclature

As with most other studly principles, naming and identification of studs is highly variable and subject to local/individual habits.  What matters is that you, and whomever else is responsible for your stud system, has a reliable, consistent method for classifying your studs.  There are several different types, suited to different ground conditions; each type will come in varying sizes, to meet the degree of difficulty presented by the footing.

Categories:

FILE0830.JPG
Four everyday grass tips, and two extra tall pointy ones for very hard ground

Grass tips: also known as “points,” these are sharp spikes meant to dig into hard ground.  They are used on the outside branch of the shoe, to avoid shredding the horse’s opposite leg.  The harder the ground, the thinner and taller the spike.  The base of the spike will have a small square “nut” portion.  Match this “nut” size with a road stud of the same height for the inside branch of the shoe.  Average “good” conditions will use a grass stud about 0.5″ to 0.75″ in height (not counting the screw end). 

FILE0829.JPG
Various small road studs

Road studs: Small, flat-topped squares or hexagons meant for hard surfaces, like roads (hence the name).  Won’t dig into ground, so much as provide a contact point for increased friction.  Often used on the inside branch of a shoe, to match up with a grass stud (base).  Or use a plain pair of road studs all around on good, level footing, like some sandy soils.  Small grass tips and roads are my #1 most-often used combination.

FILE0836.JPG
Roads and square tips;  grass tips and roads

Square tips: This is just a name I made up for them, I’m not sure what anyone else calls these, but they are my #2 stud behind grass tips/roads.  They are about the same size as your everyday grass tip, but with a square base tapering to a mild point.  Excellent for soft, but not muddy footing.  It won’t slice right through like a grass tip, but it won’t “grab” as much as a bullet.  Usually matches well with an ordinary road stud on the inside.

FILE0854.JPG
Bullets straight across on a hind foot

Bullets: Chunky, bullet-nosed studs with gentle rounded tips.  Usually 0.75″ in size, often used in wet (but not sloppy) conditions.  I may use them straight across, especially on hinds, as the bullet is relatively mild in an overstrike.

Big blocks: Road studs on steriods.  Large, square chunks of metal about the same size as your bullets.  May be matched with bullets, or used straight across.  Good for mud, as their flat surface areas increase friction.

Big bullets: Bullet-nosed with a much longer base.  Meant to dig into deep mud.  Use on outside only, (match up with a big block) and usually behind.  If you’re using them in front, it’s a REALLY bad day!  (See Fair Hill 2009)

Olympic studs: The freakin-huge monsters that still glisten with metal coating, because you rarely use them unless the ground is awfully bad (See Fair Hill 2009).  Use them on the outside behind, and with the biggest block (or perhaps a medium bullet) you can find to match.

studs.JPG

Depending exactly on where you live and the conditions you face most often, your basic starter stud kit should include:
6 everyday grass tips (you will lose one occasionally and use them OFTEN)
8 everyday square road studs (in case you want to go all around)
4 square tips (optional, but I use them a fair bit)
4 small-to-medium bullets
4 big blocks (matching your bullets) 

The studs above should take you through most horse trials with normal conditions– ideal, hard, soft, wet, slick, or muddy.  If you face a situation in which you need the big honkers…ask yourself it it’s REALLY worth running– at a 3-day, probably so.  In which case you rush on down to the tack shop trailer late at night, with your own stud kit for comparison, sit on the floor surrounded by studs, carefully measure everything out, and buy the biggest ones you can stand to use.  You likely won’t ever use them again, but they’re there anyway.


Other stud kit essentials:


 FILE0826.JPG  

So you have your studs all sorted.  How do you manage them?  I prefer to keep everything in a plastic tool box or tackle box.  Such boxes come with handy compartments and trays to keep everything separated neatly.  Some prefer to keep their studs also in tiny plastic lidded containers (think lunch snacks); this also works, but the plastic becomes cloudy and difficult to see, so keep your containers labeled appropriately for easy ID.  Separate your studs according to type and size, and arrange them logically so you can find them quickly.  (You’re often in a panic before xc anyway, especially when the ground is bad!)

FILE0827.JPG

Stud plugs:  when not in use, your stud holes should be filled with material to keep dirt, sand, and other foreign matter out.  It makes cleaning the hole much easier, and prevents grit from irritating the foot beneath the stud/shoe.  I like the white foam plugs; just push them in, and use a pointy tool (a horseshoe nail works well) to pick them back out.  To get more bang for your buck, cut up the foam stencils to make more plugs when the pre-punched ones run out.  Cotton also works, but falls out easily; same with rubber plugs.  Screw-in metal blanks are a pain, as if you must use an allen wrench, and if you don’t turn them frequently they will rust inside the hole and you are (literally) screwed when you can’t get it out!

FILE0844.JPG
Hoof pick, tap, wrench, and WD-40

T-tap:  T-taps are used to clean dirt and crud out of the stud hole after you remove the plug.  Originally named because most taps were in a “T” shape, but now I won’t use anything but my “Safety Spin” t-tap from Bit of Britain.  Horses occasionally put their foot down when you are tapping a stud hole, and the cross-bar of an original T-tap would break, leaving the hole plugged with tap.  NOT A GOOD THING!  The flat rubber handle of the safety tap will not break off, so if the horse accidentally steps down you are still ok! 

Use a 6″ adjustable wrench to apply/remove your studs (labeled with electrical tape, of course).  Heck, keep two wrenches…people often borrow them or they wander off!  Also handy for multiple horses. 

WD-40 is great for squirting in stud holes before stud-application, and for cleaning studs after use.  Spray the stud, scrub with a toothbrush (or brush-end of hoofpick) and wipe clean with a dry rag.

A magnetic dish will come in VERY handy when you drop a stud in a stall full of shavings.  You can buy the expensive dish (with powerful magnet!) from BoB, or pick up a cheaper ($1) version at a craft store in the sewing/needle department.  This magnet is not nearly as strong– it won’t find your stud buried in four feet of bedding/manure– but it still works.
 
I also keep a few other miscellaneous items in the stud kit, just as a handy place to have them: hoof pick, electrical tape, permanent marker, duct tape, extra shoes, and a hammer.

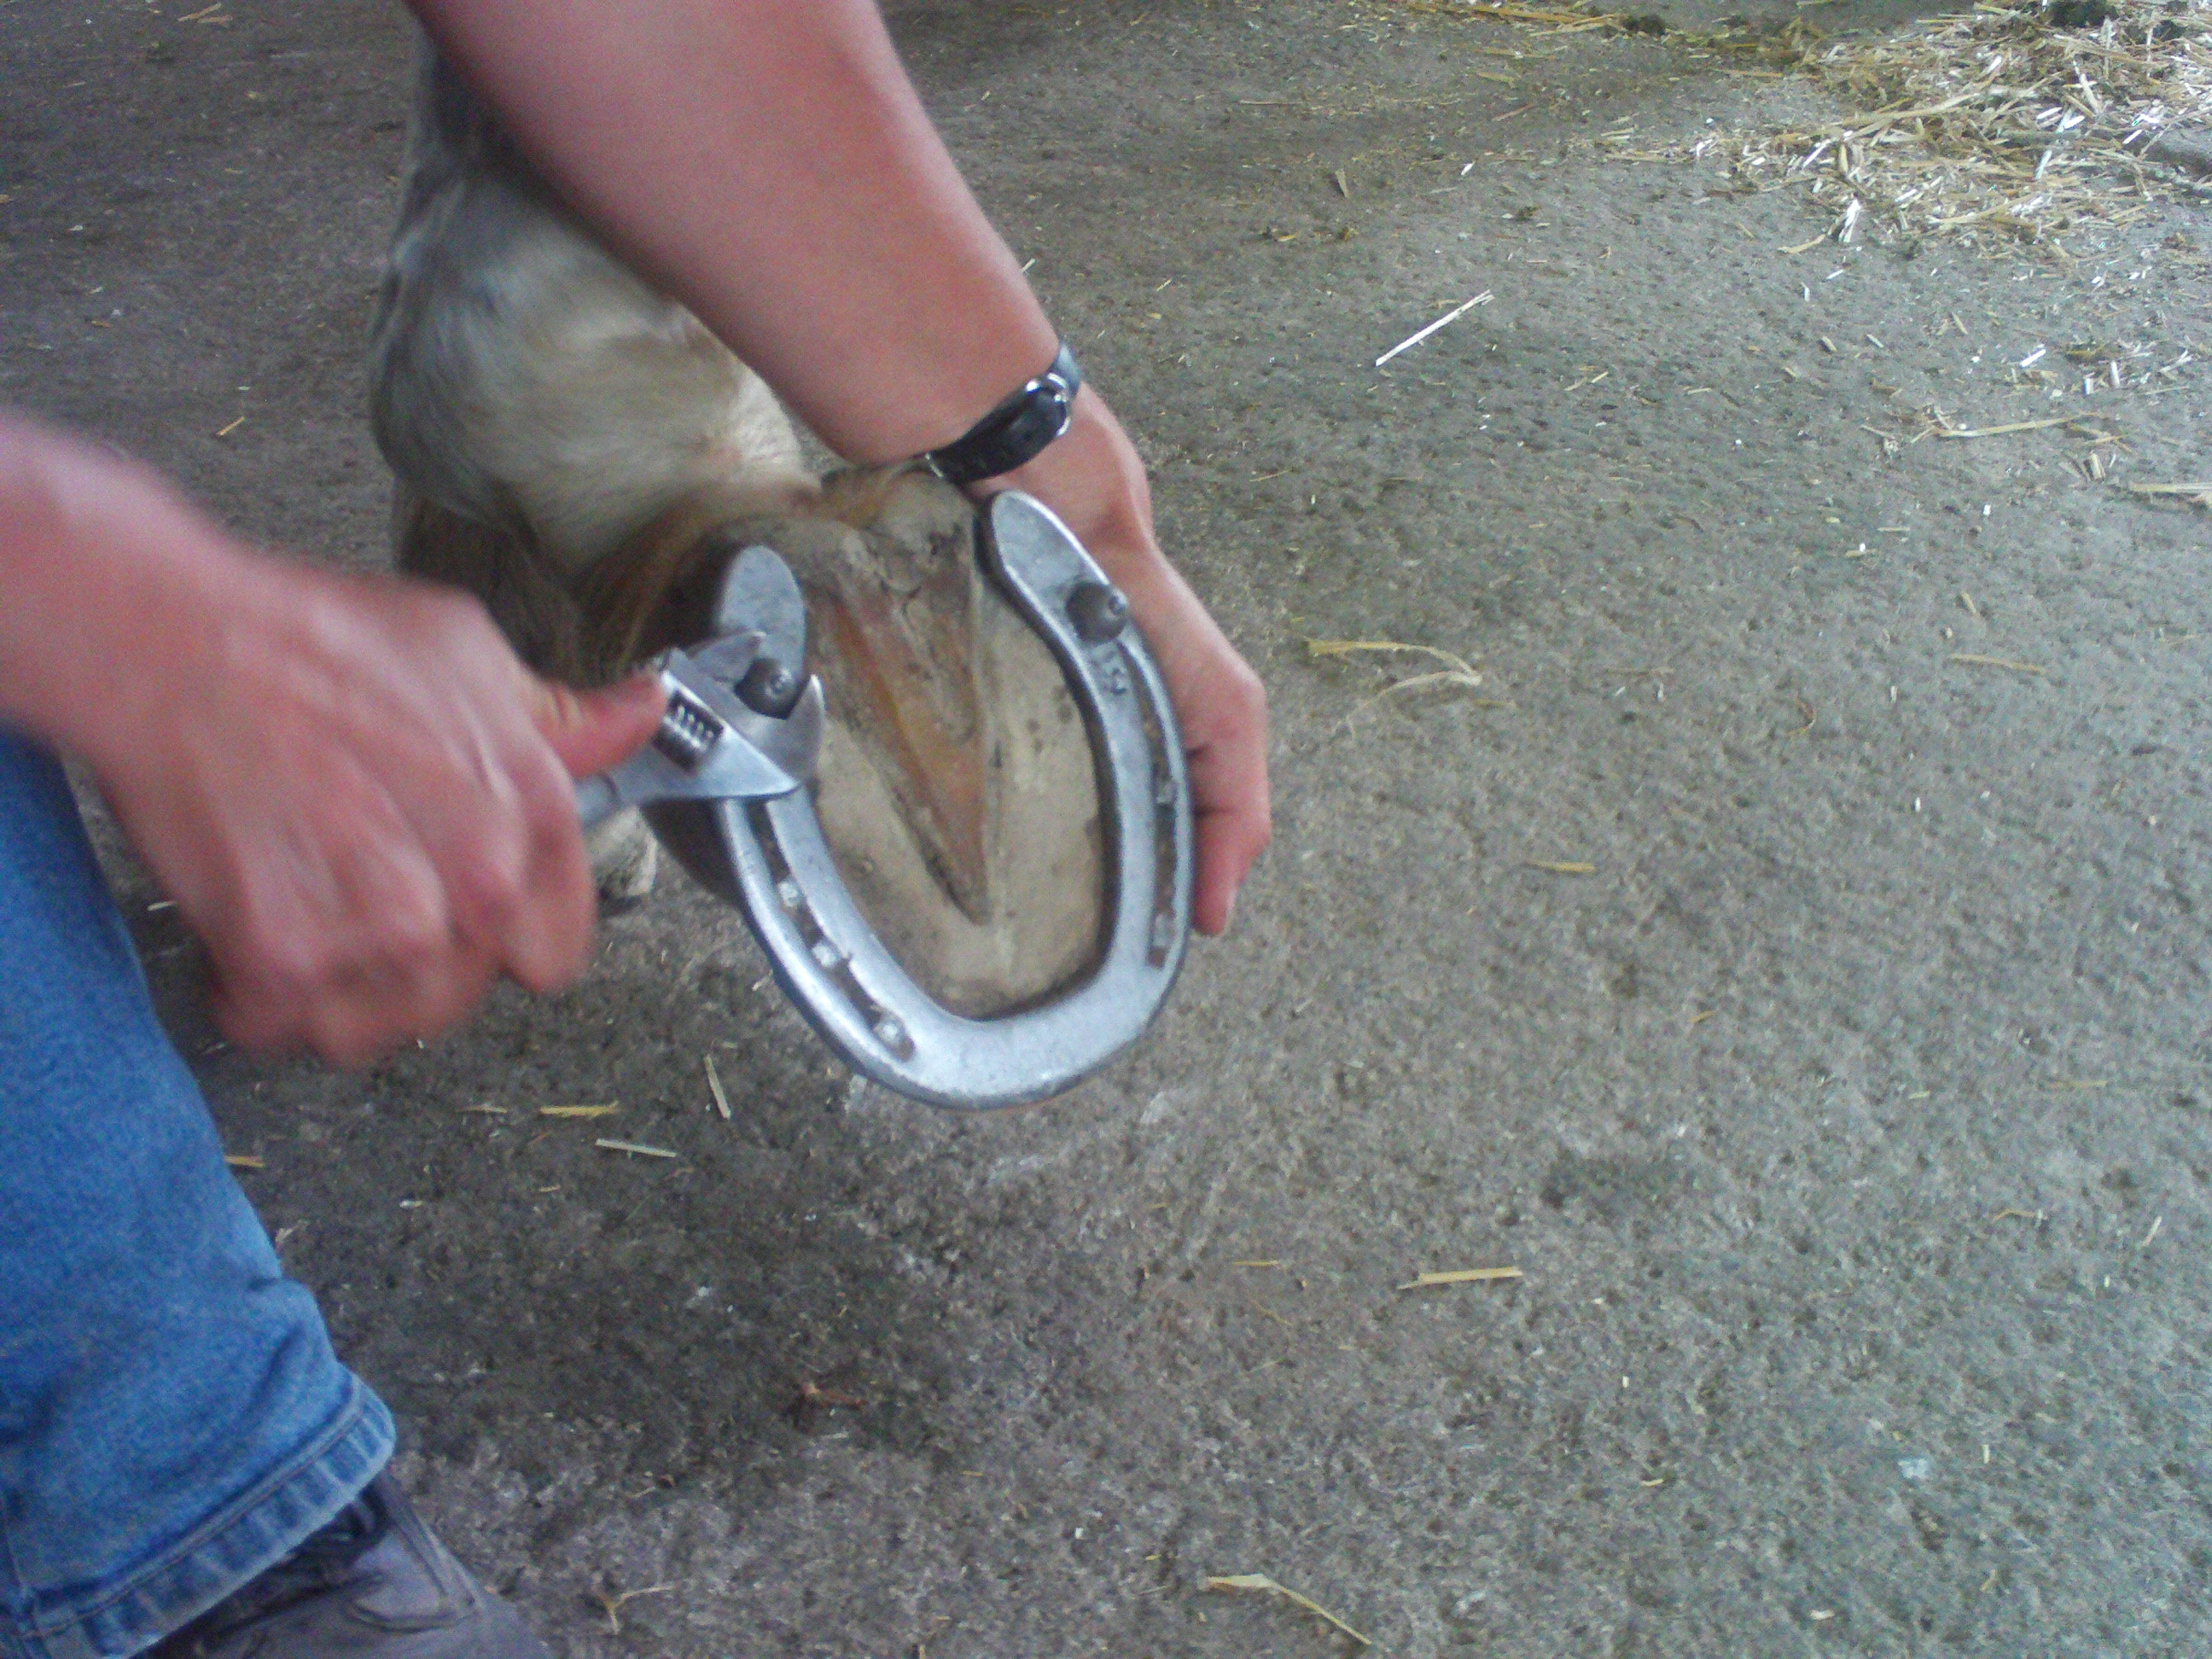
How to “stud” a horse:

1.  Put boots on first.  ESPECIALLY pull-on bell boots!!  It is difficult to stretch them over studs, often leading to cuts, bruises, scrapes, and foul language.  Putting boots on first ensures that your horse’s legs are protected in case he does something silly while standing tied, and steps on himself. 

2.  Start with a front foot.  Squat down and rest the horse’s leg on your lap, holding it gently with your “inside” arm.  (Anti-Pony Club way: If horse is calm and cooperative, you may sit on your stud box or low bucket and rest the foot on your lap comfortably.)  Use a horseshoe nail, mini-screwdriver, or other sharp pointy pokey tool to remove the stud plugs and clean the threads. 

3.  Spray the holes with WD-40.  Insert the T-tap until it just reaches the sole of the foot, then remove it.  Repeat for both holes.

4.  Start to screw in each stud with your fingers.  Remember: big on the outside, little on the inside!  It may help to separate your studs beforehand into compartments for front/hind, inside/outside.

5.  Tighten each stud with the wrench, AS TIGHT AS YOU CAN.  Be sure that the length of the stud’s threads are not taller than the depth of your horse shoe, or else it will dig into the sole creating a painful bruise.  Have a mechanic (or resourceful farrier) cut down the threads to an appropriate size if necessary.

If your horse is cooperative, with a little practice you should be able to do both feet from the same side.  Pick up the opposite foot, bring it gently under the horse, and proceed through steps 1-5 again.  Otherwise, pick up your “seat” and move to the other side of the horse to do that foot.

For hind feet, you may be able to rest the horse’s toe on the ground– this is much easier than holding it up!  And usually more comfortable for the horse. However, some will try to stand on it at the worst moment, so you may end up holding it anyway.  Use whatever method works best for you.

It takes some practice to be comfortable with your studs and tools, but try to work quickly and efficiently.  Some horses get bored holding their feet up, or simply get the feeling they MUST MOVE, and yank their foot away with little patience.  You should work on training this behavior, but at a stressful show is usually not the time nor place.  Strive to be quick, so that you can get the studs in or out before the horse has a chance to nail your toes to the floor, or cause you to drop the precious Most Favorite stud deep in a pile of shavings.


Will.groom.4.food
was kind enough to help me with the photos, and we shot some video as well.  I’m having a difficulty editing and uploading the video at the moment, but if anyone needs extra help let me know and I’ll get the video up soon.  Hopefully you can figure it out!

As always, any extra tips or comments are welcome!  BTW, send me your stories!  I want to know how Jog Up tips are working (or not) for you and your horse!  Before/after pics are encouraged!  Send them to [email protected], and they may make it into an upcoming column!

Lower-Level Event Rider Profile

It’s Reader Appreciation month, so we’re here to bring you more LL Rider Profiles!  These have been a big hit, and I love meeting our EN audience.  I’m still sorting through many of them, but if you would like to be included please fill out the Questionnaire and email it to [email protected].  


FEATURED RIDER

Name: Manny Diemer

Age: 53

Location: Raeford, North Carolina

Primary horse’s name: The Big Easy, Keystone Silhouette

Age, breed, pertinent info:

The Big Easy (Duncan) is a 12 year old Canadian Commercial/Tb cross now destroying fence lines in Alabama with a formerly good friend of ours.  Keystone Silhouette  (Stella) is a 4 year old Australian Stock Horse mare currently learning the basics

Level currently competing: Beginner Novice


Short term goals this spring/summer:  Learn to post on the correct diagonal!


Year-end goals:

Help my new horse in her training so she can start her eventing career.  Start taking lessons with our good friend Holly Hudspeth and try not to drive her totally nuts. 


Overall goals? Some day a training three day with Stella. 


What’s the best thing you’ve learned recently? 

I also play polocrosse, an obscure Aussie sport involving a racquet, ball, total insanity on the playing pitch and just about the most fun you can have on a horse.  It is helping me learn to use my aids independently. 


Favorite eventing moment/story? 

Watching my son complete his first long format CCI* with a thrid place finish, and remembering the days of the little yellow pony. 

Photo(s)


_KIS2835.JPG

Reader Appreciation Month

eventingnationlogobumperstickergoeventing.jpg
Courtesy of HC

First off, I want to say a huge “YOU’RE WELCOME!!” to all the thank-you’s we have received after the Rolex/Derby/Badminton bonanza.  Your kind words really keep us going, and it’s nice to know our hard-working (and sometimes futile) efforts are appreciated. 

That said, I want to encourage everyone to keep communicating with us!  Let us know what you like (Rolex videos) and don’t like (headline scrolling Twitter feed) and we’ll do our best to adjust the site’s content as we can.  We do this crazy site for YOU, as much as us, so speak up if you have an idea!  We’d love to hear it!  Send an email to John ([email protected]), Leslie ([email protected]) or me ([email protected]), or leave a note in the comment section.  We read every comment posted here, and try to respond when we can.

Speaking of the comment section– y’all commenters have been on fire lately!  And we love it!  Believe it or not, John does grow tired of hearing himself talk (lord knows I get tired of it) and it’s wonderful to read insights and thoughts from the rest of Eventing Nation (that being YOU).  Please continue to share breaking news, story updates, or just your general thoughts on life and horses.  We want this site to be about YOU, and not just our drivel we dribble on the screen.  Get to know each other, share advice, sympathy, or congratulations, debate and discuss hot topics (air vests?!) and have fun with it.  I *know* you support each other– read any of the comments from a Rider Profile!  We’d really like to keep building more community-type environment here, if that’s ok with you.

One thing, though.  Some of the comment conversation gets a little muddy when readers don’t bother to label themselves…it’s hard to identify which “Anonymous” poster you’re responding to.  I ask that you please make up a name— use your initials, your home state, your dog’s name, get creative with something clever– I don’t care what you call yourself (make me laugh!) but it would be nice un-anonymize the comment section a little bit.  We do NOT require you to register, or even provide an email…but a name would be nice!

Other site features:  I’m sure most of you have been here long enough (and wasted enough company time) to play around with the site format.  We try to make articles easy to find, with a comprehensive category listing, and quick-reference tabs on the upper menu bar.  There’s always the search tool, too!  If you’re having trouble locating something, let us know– we’ll find it for you, and try to improve the site’s searchability. 

For those of you who created a user account, you may also make use of the “favorite” icon next to the comment bubble of each post.  Ever wondered what that little star was?  If you’ve logged in to your account, you can click on the star and it registers that you “liked” that post.  Pretty much NO ONE does this, but it is there if you would like to use it.  Enough “likes” would tell the author to write more of it!  A little note in the comment section works just as well.  (John’s investigated an easier “like/dislike” function, but no luck yet.)

We have a lot of really awesome stuff coming up in the next few weeks (including the “Fruit Salad” referred to in the post-Rolex Live Blog).  May has officially become “Reader Appreciation Month” and we want YOU to make the site your own! 

  • I would LOVE to hear your success stories (or failures) of attempting the grooming tips you have learned on this site.  Before and after pictures would be lovely, if you have any to share!  Hopefully these first-hand accounts will be featured in an upcoming Jog-Up column.  I know many of you have been practicing your braiding– let’s see what you’ve got!

  • Do you have any good Rolex photos?  Send us your best ones, especially of fans and the crowd… who knows, it may become our new headline photo!  (Contest details coming soon.)      

Once again, thank you for reading, and for all your support.  We have the BEST fans in the world, you prove that to us every day.  (But we aren’t surprised…eventers are truly the most awesome people on earth!)  You make us proud to be a part of this sport, and we’ll continue to do our best to serve the Nation. 

Go Eventing!

The Sunday Jog-Up: Tips from a Groom

RadnorJog3-1.jpg

Do you ever stare in awe at the sleek shiny horses, the glistening brass, perfect braids, and dazzling white marks at a CCI trot up?  Do you ever wonder how they get that way?  (LOTS of hard work is the correct answer!)  Each Sunday morning we will bring you a little insider info on how the big-time grooms manage an upper level event horse.  Feel free to email or comment with specific grooming questions if you have a topic in mind!

Previous entries:  Quarter Marks 

Extreme Makeover: Button Braids , Part II

Extreme Makeover: Taming the Tail

Extreme Makeover: Mane Event

                          Shank You Very Much

                          Organizational Skills

                          Know Your Rules

                          Safety First  

                          Odds & Ends

                          What About Tack? Part I , Part II

                          Shining, Shimmering, Splendid

                          A Close Shave

                          Get those white legs white!


Have you enjoyed the Sunday Jog-Up grooming tips? Have you been trying them out at home?  Is it working?  Have you failed?  (Does your horse hate me?)  Did you discover any new tricks of your own?  Please share your stories!  I would love to hear your experiences, and any before/after photos if you have them.  I plan to do an upcoming Jog-Up featuring reader reviews, so I need your input!   Send any and all trials and tribulations to [email protected].  Thanks for reading!


Today’s topic is one of the less-glorious grooming tasks… cleaning your male horse’s “man cave” and associated hardware.  One of the geldings on the farm had a swollen sheath today, prompting me to stick my (bare) hand in there up to my elbow.  Why I always seem to do this with my LEFT hand, gunking up my watch, I’ll never know.  I’m right-handed, but the left one is always reserved for the icky stuff.  My exploratory mission revealed a huge mass of “bean” goo, resembling yellow Play-Doh (childhood will never be the same).  It took nearly 20 minutes of gentle scraping to get all the gunk out of the “bean hole,” in what was probably the nastiest sheath cleaning experience I’ve ever performed.  Thankfully there were no awkward witnesses to the process, and the gelding was cooperative enough to stand still without kicking or flinching.

You KNOW you’re a horse person when you discuss such procedures in public.  At dinner.  In great detail.  The frequency of this task varies among owners… generally most consider it a once-yearly dreaded procedure (like Tax Day), though some very dirty geldings need cleaning more frequently, 2-3 times or more per year.  Then of course, there are horses who go years between cleanings, if ever, and seem to do just fine.  As a rule of thumb, if you see streaks of black goo (Pony Club calls it “smegma”) or notice a peculiar odor from your gelding’s flank, it’s probably time.  If only geldings came with “Change Oil” lights on the dashboard..!

I considered doing my own write up of sheath cleaning How-To, but I could come up with nothing to match this original article by Pat Harris.  It’s been floating around the ‘net since 1999, so I’m sure many of you have read it before.  But I think it’s always worth another chuckle, so here you go…

Sheath Cleaning

Stick my hand up where!? One of the joys of owning a gelding is periodic sheath cleaning. This is a mysterious topic to some, so Pat Harris wrote these instructions which she posted on Equine-L.


Step 1) Check to make sure there are no prospective boyfriends, elderly neighbors, or Brownie troops with a line of sight to the proceedings. Though of course they’re probably going to show up unexpectedly ANYWAY once you’re in the middle of things. Prepare a good explanation <vbg>

2) Trim your fingernails short. Assemble horse, hose, and your sense of humor (plus, ideally, Excalibur cleanser and perhaps thin rubber gloves).

3) Use hose (or damp sponge) to get the sheath and its inhabitant wet. Uh, that is, do this in a *civilized* fashion with due warning to the horse; he is apt to take offense if an icy-cold hose blasts unexpectedly into his personal regions 😉

4) Now introduce your horse to Mr Hand <g>. What I find safest is to stand facing the horse’s head, with my shoulder and hip snugly against the horse’s thigh and hip so that if he makes any suspicious move such as raising his leg, I can feel it right away and am in any case pressed so close that all he can do is shove, not really kick. The horse should be held by an assistant or by your free hand, NOT tied fast to a post or to crossties. He may shift around a good bit if he’s not happy with Mr Hand’s antics, but don’t be put off by that; as long as you are patient and gradual, and stick close to his side, he’ll get over it.

Remember that it would be most unladylike of you to simply make a direct grab for your horse’s Part. Give the horse a clue about what’s on the program. Rest your hand against his belly, and then slide it back til you are entering The Home of the Actual Private Part. When you reach this first region of your destination, lube him up good with Excalibur or whatever you’re using.

5) If the outer part of his sheath is really grungy you will feel little clods and nubblies of smegma peeling off as you grope around in there. Patiently and gently expedite their removal.

5) Thus far, you have probably only been in the outer part of the sheath. The Part Itself, you’ll have noticed, is strangely absent. That’s because it has retired shyly to its inner chambers. Roll up them thar sleeves and follow in after it 😉

6) As you and Mr Hand wend your way deeper into the sheath, you will encounter what feels like a small portal that opens up into a chamber beyond. Being attentive to your horse’s reaction, invite yourself in <vbg>. You are now in the inner sanctum of The Actual Private Part. It’s hiding in there towards the back, trying to pretend it isn’t there. Say hi and wave to it <vbg>. No, really, work your finger back and forth around the sides of it. If the horse won’t drop, this is your only shot at removing whatever dried smegma is clinging to the surface of the Part itself. So, gently explore around it, pulling out whatever crusty topsoil you find there. Use more water and more Excalibur if necessary to loosen attached gunk.

7) When Mr Hand and the Actual Private Part have gotten to know each other pretty well, and the Part feels squeaky clean all around, there remains only one task: checking for, and removing, the bean. The bean is a pale, kidney-shaped accumulation of smegma in a small pouch just inside the urethra. Not all horses accumulate a bean, but IME the majority do, even if they have no visible external smegma.

So: the equine urethra is fairly large diameter, and indeed will permit you to very gently insinuate one of your slimmer fingers inside the urethral opening. Do so, and explore upwards for what will feel like a lump or “pea” buried no more than, I dunno, perhaps 3/4″ in from the opening. If you do encounter a bean, gently and sympathetically persuade it out with your finger. This may require a little patience from BOTH Mr Hand AND the horse, but the horse will be happier and healthier once it’s accomplished. In the rare event that the bean is too enormous for your finger to coax out, you might try what I did (in desperation) last month on the orange horse: Wrap thumb and index finger around the end of the Part and squeeze firmly to extrude the bean. Much to my surprise it worked and orange horse did NOT kill me for doing it and he does not seem to have suffered any permanant damage as a result ;-> I have never in my life seen another bean that enormous, though.

8) Now all that’s left to do is make a graceful exit and rinse the area very thoroughly in apology for the liberties you’ve taken <vbg>. A hose will be MUCH easier to use here than just a sponge and bucket, IME. Make sure to direct the water into the Part’s inner retreat too, not merely the outer part of the sheath. This may require you to enfold the end of the hose in your hand and guide it up there personally.

9) Ta-da, you are done! Say, “Good horsie” and feed him lots of carrots. Watch him make funny faces at the way your hands smell. Hmm. Well, perhaps there is ONE more step…

10) The only thing I know of that is at all effective in removing the lovely fragrance of smegma from your hands (fingernails arms elbows and wherever else it’s gotten) is Excalibur. Even then, if you didn’t use gloves you may find you’ve got an unusual personal perfume for a while. So, word to the wise, do NOT clean your horse’s sheath just before an important job interview or first date 😉

and of course, there is that one FINAL step…

11) Figure out how to explain all this to your mother (or the kid from next door, or the meter reader, or whoever else you’ve just realized has been standing in the barn doorway speechlessly watching the entire process. <vbg>)

Now, go thou forth and clean that Part 🙂

Copyright 1999 Patricia Harris; for reprint permission please email [email protected]

A few additional details:

KY jelly or generic water-based lube (go to Tractor Supply for large quantities) is also a good product to loosen gunk.  Others prefer baby oil.  You can slather the greasy stuff up in the sheath, let it sit for a few hours (or a day) to loosen all the smegma gunk for easier removal.

Latex gloves come in handy to keep the crud from building up under your fingernails, where the sickening smell will linger for a very long time.

– If you’re truly that squeamish, your vet (or ask your barn friends who does “weenie washings”) can do it for you.  The vet can also sedate the horse to make him drop for easier cleaning, also helpful for those horses who are overprotective of their “man cave.”

– Speaking of vets, drugs, and dropping, some smart-minded horse owners schedule Sheath Cleaning Day with another medical procedure requiring sedation, like floating teeth.

What about mares?  Mares get gunk, too.  The folds of the udder often accumulate dirt, sweat, and grunge, and also require cleaning.  A rag, some soapy water, or baby oil is all you need.  Mares are much less intimidating, at least anatomically…there is no monstrous cavern to swallow your whole arm, and all parts are external and possible for visible inspection.  Like geldings, frequency of cleaning is largely dependent upon owner preference and the individual horse’s level of cleanliness.  Be careful!  In my experience, mares are often more sensitive than geldings about handling between the hind legs; however, most can be trained to tolerate it.

Do you have any good weenie washing tips or stories?  Share in the comment section!

Lower-Level Event Rider Profile

You may have seen John mention one of our regular commenters, “lec,” who often takes time from her busy schedule to put up with us Yanks and give us the inside scoop from across the pond.  Lec was also one of the first to send in a LL Rider Profile, and it’s high time we learned a little more about her!

FEATURED RIDER:

Name: Lucy

Age: 29

Location: Somerset, UK

Primary horse’s name: Gulval Mastermind (Rodney)

Age, breed, pertinent info:
11, TB x Hanoverian (by Silver Owl) Showed a lot of promise then had a season to forget in 2008 which was due to hock problems. Now jumping and going better than ever so hopeful of a good season and getting back to 1* level. Will hopefully move back up the levels quickly to what he was previously doing before the hock issues.

Level currently competing:
Starting first event at intro (novice?) then quickly moving to PN (training?) before ending up back at Novice (Prelim)

Short term goals this spring/summer:
To actually have fun and not get caught up in the crap of trying to do well and missing out on the fun in the process as putting yourself under so much pressure. Ideally I would like to qualify for Badminton Amateur Champs and get some points at novice.

Year-end goals:
I would love to finish on a 1* but will have to see how it all goes and look at finances.

Overall goals?
I would love to get to 2*. I would also like a youngster to bring on and hopefully not make as many mistakes as I made on this one.

What’s the best thing you’ve learned recently? 
If you are quite tall like me (5’9) and struggle with your shoulders going too forwards and over balancing you at jumps then push your hips forwards more and this changes the alignment of your shoulders and keeps you in better balance over xc fences. Another was that if you have a horse that rushes ride off your corners more powerfully and then the whole process will be smoother and the horse will not change the canter so much in rushing.

Favorite eventing moment/story? 
My trainer coming 4th at Luhmuhlen 4*. It proved that one horse amateur riders could compete at the highest level and do well at it.

Photo(s) or videos:  

My Old Kentucky Home

Derby post time – 6:24 ET

My Old Kentucky Home is one of the few state songs that is almost universally known.  I can’t tell you the official song of Illinois, California, or Idaho… but almost everyone has heard MOKH at some point or another.

That “some point?” It’s likely the Kentucky Derby.  In a time-honored tradition, the famous anthem is played as the horses come out on the track for the post parade.  The entire grandstand sings along (some fumbling the words, and often a bit slurred in the infield…).  Jockeys try to put on their “game faces,” but many will shed a tear or two.  It’s a very emotional moment, holding back excitement and hope, while paying tribute to the horses and races of years past, and to the state itself.

Anyone from Kentucky knows this song by heart.  And it means something extra special to a Kentuckian; it tugs at your heart strings a bit, no matter how many times you’ve heard it.  And you hear it a lot here…at football games, basketball games, the Derby, political events, almost as much as the Star Spangled Banner.  Still, you never get tired of it.  And heaven help an outsider who dares to diss the song– you may as well spit in our face.  It sounds corny, but MOKH is a love song– a love affair between a people and the place we call home.  We’re proud to share our song, our state, and our horses with the rest of the world on Derby Day.

Lyrics:

MY OLD KENTUCKY HOME
by Stephen Foster

The sun shines bright in the old Kentucky home,
‘Tis summer, the people are gay;
The corn-top’s ripe and the meadow’s in the bloom,
While the birds make music all the day.

The young folks roll on the little cabin floor,
All merry, all happy and bright;
By ‘n’ by hard times comes a-knocking at the door
Then my old Kentucky home, goodnight.

CHORUS
Weep no more my lady
Oh! weep no more today!
We will sing one song for the old Kentucky home,
For the Old Kentucky Home far away.

They hunt no more for the possum and the coon,
On meadow, the hill and the shore,
They sing no more by the glimmer of the moon,
On the bench by the old cabin door.

The day goes by like a shadow o’er the heart,
With sorrow, where all was delight,
The time has come when the people have to part,
Then my old Kentucky home, goodnight.

CHORUS

The head must bow and the back will have to bend,
Wherever the people may go;
A few more days, and the trouble all will end,
In the field where the sugar-canes grow;

A few more days for to tote the weary load,
No matter, ’twill never be light;
A few more days till we totter on the road,
Then my old Kentucky home, goodnight.

CHORUS

Go eventing.

All you need to know about the Derby Infield

John and I both follow an extremely popular, successful amateur blog known as “Kentucky Sports Radio” (KSR).  In fact, that site was the inspiration for this one.  It follows mostly UK football and basketball, in “the most ridiculous manner possible.”  The writers are everyday fans, but talented, knowledgeable, and funny.  Just like us.  Occasionally, KSR has a horse racing-related article; with Derby coming up, they didn’t let us down.  From my favorite KSR writer, Tomlin… Enjoy!
                                                                                                                                 

by Tomlin @ 12:15pm  Wednesday April 28, 2010

Friends,

How are you? How did the procedure go? I can barely see the scar. Yes, you do look like Carol Channing. Top notch!

As you may have realized, if you follow the standard Gregorian calendar, this coming Saturday is officially the first of May, which by default also means that it must be the date of the running of the Kentucky Derby. Perhaps you’re planning on going, or perhaps you’re planning on just wearing a giant hat in the comfort of your own home. Today, as a service to those planning on attending the Derby Infield, I have been asked to reprint here an informational piece on protocol during the event.

———————–

Welcome to the Derby Infield!

We at Churchill Downs would like you to know how excited we are that you could join us for the 136th Kentucky Derby – it’s sure to be a great day, and we’re very happy that you have decided to enjoy the Derby from the Infield.

To ensure safety for all our guests, please take a moment to heed the following information during your day at Churchill Downs.

-You no doubt, right now, have hard liquor duct taped all over your entire body. Yes, we may pretend we don’t know, but we do. All we ask is that you watch your step when navigating the oft-crowded Derby Infield. Believe us; impaled on a bottle of Rumplemintz in a pair of cargo shorts and a trucker hat is not a distinguished way to die. Please watch where you walk.


Portable toilets are available at many locations in the Derby Infield. By early afternoon, however, will likely see long lines. We have been assured by the company which has rented us these facilities, however, that they should remain sanitary and fresh throughout the entire day. We have no reason not to take their word for that, but will be sure to monitor the situation from our air-conditioned suite on Millionaire’s Row.


-Please refrain from exposing your genitalia while visiting the Derby Infield. While we do realize the prestige of this fascinating sporting event can cause a great deal of excitement, it is generally better-enjoyed by keeping one’s clothes on. Please save your nudity for the Belmont Stakes or at Louisville’s acclaimed “Fourth Street Live!” â„¢


-We encourage Derby Infielders to bet on all of the days races gratuitiously. This is because we realize that no one in the Derby Infield knows anything at all about horseracing, but love to place bets. In fact, the recent construction completed at Churchill Downs was made entirely possible by funds from the Derby Infield 2007.


-Please be aware that no one here is “connected” to the horse industry, no matter what they say. No one in the Derby Infield knows anyone in the horse industry, or they wouldn’t be in the Derby Infield.


-You know that Kid Rock song that mixes Werewolves of London with Sweet Home Alabama? That song will play all day long. As a service to you.


-With luck, temperatures should raise into the upper eighties with a high humidity, ensuring that everyone around you will be as sweaty as possible. In an emergency, crews will place black plastic tarps all over the infield to make sure everyone remains completely hot as well as filthy.


-That’s not mud. We’re just saying.


-Go ahead. Mouth off to that cop. See what happens. I dare you.


-At the end of the day you will not look as good as you think you do. You should be aware of this. It’s the Derby Infield. After the last race, you will think you can just “go out dressed as you are.” You will be wrong.

———————–

If you’re headed to the Derby this weekend, friends, please make sure you heed these official rules and guidelines, stay safe, and enjoy a great weekend in the Bluegrass. Until next week.


Many thanks to Tomlin and KSR for sharing these thoughts, and for setting John and I down the path of ridiculous sports reporting.  I will be representing EN at the Derby on Saturday, though likely not in the infield.  Let’s hope for clear skies, big payouts, and a safe race!

Kentucky Derby Preview

Derby week is now upon us.  This may as well be Mardi Gras for the city of Louisville– it’s party time all week long.  With Thunder Over Louisville, the largest fireworks display in the country; mattress races downtown; Hot Browns, Derby Pie and Mint Juleps; Derby Day is almost here.  For two minutes, the eyes of the world will be focused on the Commonwealth of Kentucky as twenty Thoroughbreds do what they do best: run.

One of the great things about not being an “official” publication, is that we don’t exactly have to play by “official publication” rules.  Whenever the Derby is mentioned in the Blood-Horse, or Thoroughbred Times, you will see it written as “The Kentucky Derby presented by Yum! Brands.”  Blech.  It’s The. Derby.  And I steadfastly refuse to add the suffix so expensively purchased by the Yum! Corporation.  Talk about Yuck!

Ok, glad that’s out of the way.  Down to Derby business.  I, of course, like every other racing enthusiast, had Eskendereya at the top of my Derby list.  Until Sunday, when Todd Pletcher announced that the Derby favorite was scratching due to significant swelling in his left front leg.  Well darn.  Now what?

I could go into a long line of drivel about pedigrees, past performances, racing tendencies, jockeys, trainers, and the like.  Instead, I’ll just refer you to The Blood-Horse, DRF, and Thoroughbred Times.  Their experts will tell you anything you need to know.  Honestly, the Derby comes down to luck perhaps more than talent; pick a name or a random number, and you have about an equal chance of picking the winner.  Twenty three-year-olds going a mile and a quarter in two minutes: your guess is as good as mine.

That doesn’t mean I don’t have favorites, though; horses I’d LIKE to see win, or at least run well.  I’ve never been a huge Pletcher fan, but you can’t help feel just a little sympathy for a guy who’s run 24 horses in the Derby and has yet to win.  He’s entered a filly, Devil May Care, in place of hotshot Eskendereya.  Pletcher’s only Triple Crown victory?  He took down the mighty Curlin in the Belmont with a special filly, Rags to Riches.  Maybe he can get it done on Saturday with another super girl?

Speaking of O-fer’s, there is the dominant Maktoum family from Saudi Arabia.  They’ve won pretty much every major race all over the world; they’ve spent untold millions buying the best bloodstock, building the best farms, and they’ve single-handedly kept the auction market going.  Yet all that money hasn’t bought them a Kentucky Derby.  They have a nice horse, Conveyance, in training with Bob Baffert.  The Indian Charlie colt had an impressive work Tuesday morning at Churchill.  If it’s not Pletcher’s year, maybe it’s theirs?

Baffert’s other horse, now the favorite, Lookin’ At Lucky has certainly had no such luck this spring.  Lucky has had to overcome several awful trips, yet never quit fighting to the finish.  He’s still supremely talented, and perhaps the Derby gods will bless him with the perfect ride at just the right moment.

Just because I’m a huge Tiznow fan, and Winstar is one of the most gorgeous farms you will ever hope to see (and the people are fabulous too), I’ll throw in a little plug for their entrants: Super Saver and American Lion.  Of the two, I’m leaning American Lion, simply because he’s a Tiznow baby (and he’s NOT trained by Pletcher, Baffert, Lukas, Asmussen, etc).

The Road to the Roses challenge is winding down, and our leading entrants are way out in front.  Pari Mutuel Wagering has 329 points, followed by HoosYourDaddy (319), Bourbon Bliss Barn (313), and Slew Stable Won (309pts).  Thanks to all 37 stables who participated, and good luck in the Derby!  We will feature another challenge for the Breeders’ Cup, and again for Derby next year! 

This post would not be complete without a brief shoutout to the fillies’ race of the year, the Kentucky Oaks.  The Oaks is run Friday before the Derby, and doesn’t get quite as much national publicity as it should…but it is a monumental race just the same.  I’m sure you’ve heard of last year’s Oaks winner, the great Rachel Alexandra.  2010 top contender She Be Wild is out of the race, but Blind Luck looks to be the one to beat.  As a side note, “Blind Luck” is an awesome name for this filly: she is by Pollard’s Vision (who was born with only one eye), out of the mare Lucky One.  I wish my horse names could be so clever!

An incredible moment and a special Rider Profile

We’ve all seen the magical photo by now… and I’m sure many of us were just a tiny bit jealous of the adorable girl getting to pet Rolex superstar Mandiba.  Kudos to Josh Walker for capturing this moment, which really explains what eventing is all about. 

EN has learned the identity of the now-famous Pony Clubber, and we are pleased to introduce her to you in a very special edition of LL Rider Profile.

FEATURED RIDER:

Name: Keely Bechtol
 
Age: 8
 
Pony Club rating:
I am in Bluegrass Pony Club, I am a D1 and I’m going to try to rate up in the fall.
 
 
What was it like serving as “dressage gate crew?”  Were you nervous in front of the crowd? 
It was fun, I got 15 autographs on my cap! I wasn’t nervous and I got to see people I met last year and made some new friends.
 

Who was your favorite horse(s) or rider(s) that you watched? 
I was rooting for William Fox Pit, Oliver Townend and Karen O’Connor.
 

Can you describe the moment in the photo?  Did you ask Karen if you could pet him, did she offer?  What do you remember most about Mandiba?
Ms O’Connor asked me if I would like to pat Mandiba, he was sweet and gentle.
 
Did you get to watch the rest of the event?  What was your favorite xc or sj memory?
My favorite was watching Mandiba on cross country because he became my favorite after patting him!

 
What is your own pony like?  What are your accomplishments/goals with him? 
My pony is a mare, her name is La Dee Da, she is almost 13hh. I like to do dressage, play mounted games, jump & trail ride with her.  Last year we won D1 Rally, she did a great dressage test!
 
Anything else you’d like to share, about yourself, Rolex, or Pony Club?
I would like to compete at Rolex one day in the Prince Philip Cup and then when I’m older do Rolex Three Day Event.
I think I am really lucky that I got to work at Rolex and that I have a pony.
I take riding lessons at Scheffelridge Farm.
I love Pony Club, it teaches me how to do things on my own.

KeelyPony2.jpg   KeelyBPony.JPG

Eventing Nation Progress Report

rolex98 002.jpg
Waving thanks to all our Eventing Nation readers!

It’s been about 7 months since little itty-bitty EN began, back at Fair Hill 2009.  My, how things have changed since the nation’s last major three-day event!  Back then, John was live-blogging by himself, read only by a few friends (well, the paid ones) and random people who stumbled upon the site through a Google mis-direction.  Fast-forward to Rolex, where EN is big enough to stand alongside the Chronicle of the Horse to provide competition coverage to 5,600 visitors on Sunday.  It’s been quite a journey, and we would like to thank each and every reader who has helped us on this ride.

So, as we take a (quick) breath between Rolex and Badminton (oh yeah, and that thing called DERBY), let’s examine the Eventing Nation Progress Report.


UNIVERSITY OF MAINE
PROBATIONARY EMPLOYEE
PROGRESS REPORT

(we run on a limited budget here, so I just copied a sample form from somewhere on the net)

NAME OF EMPLOYEE Eventing Nation                        JOB TITLEOnline Eventing Site        
UNIT:  Equestrian Insanity Division  

REVIEW PERIOD —  FROM: 
Oct 2009    TO:  May 2010       NEXT REVIEW DATE:  WEG 2010


PERFORMANCE CATEGORIES      
1 (Not satisfactory)  2 (Needs improvement)   3 (Average)  4  (Above average)   5 (Mastery)

COMMUNICATION/INTERACTION WITH OTHERS:

Communicates clearly and positively with co-workers, supervisors, and others.
4.  There is pretty good communication here at EN…especially at 1am, I’m convinced John never sleeps.

Listens carefully to instructions.
3.  Um, there were instructions?  I thought we kinda made this up as we went along…I KNEW John should have stopped and asked for directions at that gas station!

Employee is receptive to feedback from supervisor.
5.  I think we do a pretty good job listening to readers’ comments, what do you think?


QUALITY/QUANTITY OF WORK HABITS:

Works at a consistent pace regardless of presence of supervision.
5.  There’s a supervisor??  Who knew…!  We try to stay consistent, around 3 posts a day.  Unless Oli Townend changes his facebook status every 2 hrs, that may require more posts.

Completes work assignments in a reasonable period of time.
5.  I think we get our info up pretty quickly, most of the time.  At the expense of sleep, or our day jobs, usually.

The quality of completed work is satisfactory.
3.  Eh.  Depends on the definition of “satisfactory” I suppose…

Employee readily begins new assignments.
4.  There’s ALWAYS a new assignment, that’s for sure.  Badminton coming up! 

Uses work time efficiently.
3.  Nope, not really.  Unless it’s 3am, then things tend to get very efficient. 

JOB KNOWLEDGE:

Employee can adapt to changes in priorities and/or schedules.
5.  Priorities and schedules, haha.  As if those EVER stay the same!  We do our best to manage the site, maintain paying day-jobs, ride our own horses, oh and compete a little on the side.  Life?  What’s that?

Has demonstrated that he/she has the skills and abilities to do the work.
3. We’ve demonstrated a lot of things, I’m not sure you’d call them “skills,” per se.  But I’ve become very proficient at surfing Craigslist.  Does that count?

Performs work in accordance with FM policies and procedures.
5.  I have no clue what FM policies are.  But I assure you we are in accordance with them.  Or that’s what John told me to say.  We are mostly in accordance to FEI policies, at least, until they changed 30 minutes ago.  No, make that 30 seconds ago… to bute or not to bute?  It’s still an unanswerable question.

Practices knowledge of safety procedures.
5.  Air vests, frangible pins, and styrofoam logs: check.  And we never write without our ASTM helmets, either.  You never know when a Fatal Error message may occur. 


DEPENDABILITY/ATTENDANCE

Prepared to begin work at beginning of shift.
4.   I wouldn’t call it “prepared;” more like, thrown together to sound intelligent.  Yeah. That.  As long as it sounds good, right?

Independently follows through on assignments.
5.  You have no idea how much work it is to follow through some things…like the Bracket Battle…but we do it anyway.  That’s the exhausting part of this gig.  It’s easy to start something, it’s the finishing it that keeps you up til 3am for days on end!

Provides adequate notice to supervisor for using vacation/sick leave.
3.  You mean we get sick days and vacation???  Where was this in the contract?  Sweet!

Submits accurate sick leave and vacation reports in a timely manner.
3.  I’m still excited about the prospect of vacation days.  When do the benefits start?

SUPERVISORY FEEDBACK (attach additional comments if necessary)

1. Describe examples of outstanding work performance or areas of work performance that will require additional attention. Please use specific examples of work performance and/or expectations.

I may be biased, but I think this site has filled a unique niche in the eventing news category.  John started this site with a vision to bring all members of the eventing community together: one place to share news, insights, and information with the humor and fun that makes our sport special.  We want to keep you in the loop, bring you with us to the Fork or Rolex, and still make you laugh along the way (whether it’s Santa).  Hopefully you’ll visit a few minutes a day, to get your daily dose of news and absurdity, and keep coming back for more. 

We fully admit we’re learning this as we go.  None of us are journalists or tech geeks; we’re riders, horselovers first and foremost.  This is just our way of giving back to the sport, helping it grow and succeed, sharing it with all of you.  The site doesn’t generate ANY income, we are not paid in any way (John’s forced to keep his “Night Job” to pay the bills) other than your heartfelt appreciation. 

Thank you so much for reading.  To our new visitors: welcome!  Kick back your heels and stay a while.  To our old standbys: I hope you’ve enjoyed watching the site grow over the past 7 months, and who knows how far we still have to go.  We appreciate everyone who clicks, and the depth of audience is really amazing: from the 12-year-old Pony Clubber, to the Olympic Gold Medalist, sometimes it is a bit overwhelming.  When you find links to something you wrote on horse sites all over the world; when you hear strangers at events quoting your grooming tips; when a Big Name Coach comes up to you and asks “wtf is up with Chattahoochee’s Five Star??” after an April Fool’s joke.  It is humbling and inspiring.
                      
We aren’t anything special here.  But we are part of a very special sport, and a very special Nation.  For that, we are most thankful.

Keep reading, and GO EVENTING!

Look! A live chat!

As part of our frenetic attempt to bring you the very best Rolex coverage, we’ve created a little play area for our readers to chat and discuss the latest rides and rumors in real-time.  Click on the Chat Now button in the sidebar, in the upper right corner.  This feature will be open 24hrs throughout the event, so feel free to join in whenever you wish.  EN writers may pop in from time to time, as our hectic Rolex schedule allows.   

Thursday Update from John: Vis and I were up until 2am Thursday morning trying to get the live chat installed on the site.  But throughout Thursday it kept crashing, not loading for people, and generally causing me anger.  Therefore, I have decided to take it down until we either fix the current program or get a better one.  I apologize for any convenience.  This is going to be an exciting feature once we get it working properly.

Also, please notice the handy media links added to the sidebar.  There, you can access current scores, live video feed (it is pay-per-view), and your favorite riders’ competition times.   We also have a scrolling Twitter feed, so you get the latest information from a variety of media sources. 

If you have any additional suggestions, questions, or comments about our Rolex plan of attack, don’t hesitate to email, leave a note in the comment section, or send reply to @eventingnation on Twitter.  

The Sunday Jog-Up: Tips from a Groom

RadnorJog3-1.jpg

Do you ever stare in awe at the sleek shiny horses, the glistening brass, perfect braids, and dazzling white marks at a CCI trot up?  Do you ever wonder how they get that way?  (LOTS of hard work is the correct answer!)  Each Sunday morning we will bring you a little insider info on how the big-time grooms manage an upper level event horse.  Feel free to email or comment with specific grooming questions if you have a topic in mind!

Previous entries:  Extreme Makeover: Button Braids , Part II

Extreme Makeover: Taming the Tail

Extreme Makeover: Mane Event

Shank You Very Much

                          Organizational Skills

                          Know Your Rules

                          Safety First  

                          Odds & Ends

                          What About Tack? Part I , Part II

                          Shining, Shimmering, Splendid

                          A Close Shave

                          Get those white legs white!

QUARTER MARKS


Today we will begin an exploration into the groom’s ultimate canvas: a beautiful butt.  Quarter marks are used to enhance a horse’s hind parts (as an Irishman I know so often calls them), and to sometimes make a “statement,” especially at team events.  You may see a Kiwi bird on a NZ horse, maple leaf on the Canadians, or something cute that goes along with a particular horse’s name/theme.  Pretty much anything goes, so long as it is TASTEFUL and respectful towards the horse.  Here’s a link with some beautiful work.

One little thing here:  no real groom would be caught DEAD using a stencil (that’s the plastic-thingys you can buy at a tack store) to create a basic pattern.  All checkerboards, diamonds, triangles, etc are done freehand.  A thin, fine plastic comb is the tool of choice.  Yes, it takes time, patience, practice, and skill; but it allows you to slightly modify a design to better suit the horse.  And you don’t leave the awful square outline from the plastic pressed into the butt.

Tools:

Fine-tooth comb— a flea comb, or 2″ broken section of plastic hair comb works well

Small body brush— palm-sized, with short, firm bristles.  A child’s body brush, or even a small scrub brush does the trick.

Spray bottle— you can use plain water, water mixed with QuicBraid, or flyspray to dampen the hair.  Some people use Showsheen, but I don’t like spraying it on the body (tails only).

Let’s briefly discuss your basic pattern options:

CHECKERBOARD

The most basic, classic design.  Generally the squares range in size from 1.5″ to 2″, whatever the size of your comb.  Brush the horse’s haunches as normal.  Start about a hands-width off the dorsal line; the size of your checkerboard is determined by the size of your “canvas.”  Usually centered between point of croup and the tailhead.  Most of the time, smaller is better– about 7 squares or so.  Hold your comb parallel to the horse’s spine; comb straight down (perpendicular to spine) firmly to create a square.  Move over one comb-width.  Create another square by combing down.  Keep going until it is the size you want.

Alternatively, you can create larger squares (think Purina) by using your small body brush instead of the comb.

  Big Checkers QM

DIAMOND or PYRAMID

A spinoff of the checkerboard.  Same technique applies, only space your “checkers” in a diamond or pyramid pattern.  It is a bit more compact, so this design looks good on horses with more pointed hindquarters, or who are a bit delicate (mares, smaller horses).

VEE

This design is not created with your little plastic comb– instead, use the small body brush.  Visually map out the size of your canvas, and lay your base by brushing all the hair (your whole “canvas”) straight downwards.  I usually cover an area from point of croup, to below point of hip, across to point of butt.  Make a smooth lower border by brushing horizontally (“with” the hair).  Starting just at or behind the point of croup, brush diagonally downward to the middle border of your canvas.  Then create the other side of the Vee: brushing diagonally downward (against the hair) from near the tailhead to intersect with the other lower edge.  I like to use this pattern on horses with pointy butts, steep croups, or those who seem to lack a bit of muscle.

RACING STRIPES

Definitely the easiest hind-end dressing to apply, and it’s often my go-to QM of choice.  Start by brushing the butt as normal, with the hair.  Then, using the small body brush, start at or just barely behind the point of croup.  Hold the brush vertically, and stroke straight down.  Move over one brush-width.  Brush straight down again.  Repeat.  You now have three vertical stripes.  Even the lower edge of the stripes by brushing horizontally with the hair.  I love this design on horses with large, powerful hindquarters– it’s simple, yet striking.  Also, vroom-vroom for XC!

Racing Stripes QM

Now, the upper portion of the HQ is decorated.  Time for the lower half, to be covered in “flashes” or “sharks teeth.”  I’m not really sure how this pointed pattern originated (give the illusion of movement?  Jaws attacking your horse’s hamstrings??) but it looks really cool.  It takes a few tries to get the hang of it, but keep practicing.

Begin by clearing your canvas, brushing with the direction of hair.  Let’s start on the horse’s right side.  Hold your brush somewhere in the middle of the haunch, well below your upper design.

Brush in a sweeping, diagonal upwards motion towards the tail.  Immediately follow it with a downwards diagonal stroke, from hip toward gaskin.  You now have one “point” or “tooth.”

Begin the second tooth right alongside the first, but staggering your brushstroke a little farther forward (toward the stifle).  Brush upwards diagonally again, parallel to the first.  Now, brush diagonally downward again, parallel alongside the first downward stroke.  You now have a second point.

Continue on with the third tooth, and if it suits the horse, a fourth.  Be prepared to get mad, frustrated, and start over (and over, and over) while you’re learning.  Over time, you’ll develop the proper angle for each stroke, and just how much length looks good.

The video below includes demonstration of Racing Stripes, Sharks Teeth, and the Vee.

A few other notes:

Always check behind the horse to ensure your QM are even on both sides (especially on top!).  Finish the job with a brush swipe straight down the spine toward the tail, and with half-circles either side of the tail (down the hammies) to “close out” your flashes.
Play around with different designs to see what suits your horse.  If you cannot master one design, obviously don’t do it!  Poorly-done QM are worse than none; sometimes the horse’s hair just won’t cooperate.  Also, if your horse has a skinny butt, don’t call attention to it!!  Save the design for later, when he develops something worth looking at.

Generally, I don’t do quarter marks until prelim level or above.  QM at the lower levels can be a bit “overdressed,” and many LL horses aren’t quite as developed behind (see above).

Practice, practice, practice!  The great thing about quarter marks, is they are easily erased, so you can always start over.  Once you master the technique, it doesn’t take much time.  But when you’re fiddling around trying to get sides even, or debating which design to use, you waste precious time that the horse could be warming up!  Don’t be in a rush, do your preparation beforehand, it will be much less stressful.

Sadly, quarter marks don’t show up on grays.  Unless you try to get creative with grass stains.  The only way to get QM on a gray horse is to body clip them in, something I might try at a fall three-day when I’m clipping anyway.  Those of us with grays never get to have any fun…we’re just stuck scrubbing green crap off our horses four times a day, soaking our hands in purple shampoo.

Oh, and I realized I forgot something from the braiding tips last week:  Keep a magnetic dish handy!  (the magnetic stud dish is great, but you can buy a needle dish for $1).  Inevitably, you WILL drop the needle somewhere in the stall.  Having a magnet greatly helps you find it, and sleep peacefully instead of nightmares about sole punctures.

Lower-Level Event Rider Profile

Once again, it is time to meet a fellow member of our Eventing Nation.  To see previous rider profiles, click on “Rider Profiles” in the Categories sidebar.  These features have been interesting and insightful– I am continually impressed and humbled by our readers as the emails keep pouring in.  You guys rock!  

If you would like to be featured in an upcoming profile, please fill out the Questionnaire and email it to [email protected].  Thanks again to all our participants…there are many profiles to post, and hopefully we will get to yours soon!

Snapshot 2010-04-15 16-09-27.jpeg

Your Name: Brittany

Age: 23

Location: Minnesota

Primary horse’s name: Pleasantly Confused (aka Silver)

Age, breed, pertinent info: 5, QH, but more of a TB build

Level currently competing: Green as grass, pre-BN

Short term goals this spring/summer:
To get around the whole event course without injury 🙂  and to work on our dressage efforts(this might mean participating in some dressage only shows AHH!!).  Also since I’ll be graduating from RN school I’ll be happy I can actually RIDE my horse.  

Year-end goals: Our first BN event!  

Overall goals? 
To have a consistant jumping effort.  She’s green and really dosen’t think she can jump sometimes, even though other times she will FLY over things.

What’s the best thing you’ve learned recently?  Any big epiphany or light-bulb moment? 
A light-bulb moment came during a gymnastics run when I realized that my horse gets super mad if I don’t give her credit when she does an amazing job (I got bucked off).  So now I give her amazing applause after every effort and we’ve been doing much better, and shes a happy little camper and keep continuing to try.  

Favorite eventing moment/story? 
VOLUNTEERING.  Even if I do not have a horse capable of making it around some of the “real” events, doesn’t mean I can’t participate in helping out the people who do.  I want these great events to be here when my horse finally makes it to a level where we can actually SHOW in them.  So volunteering is really important to me.

I love Brittany’s attitude!  Volunteers are truly the unsung heroes of our sport.  Please heed Brittany’s advice and support your local events by helping out!  

Wednesday Jog-Up: Button Braids, continued

Tango024.jpg

I ran into some technical difficulties with the editing software, and was unable to properly finish the braiding tips of this past Sunday’s edition of Jog-Up.  So here’s the end of it, as a special Wednesday jog edition.  (Missed Sunday?  Benny’s Button Braids, Part I)

WHAT ABOUT THE FORELOCK?

FILE0695.JPG      FILE0707.JPG

The braiding video included instructions on the forelock braid, but I’ll expand on that a bit here.  You may have noticed that Benny is blessed with a “Fabio” forelock… long, luxurious, and thick.  I love a healthy forelock (my mare’s is pitiful), but I’ll be the first to admit they are not easy to braid.  It takes extra dexterity to deal with the mass of hair, and it seems like you keep braiding…and braiding… and braiding… to get to the end of it.  And the end is always thin, brittle, and wispy.  Avoid braiding to the very end!   Finish your braid with the “hogtie” one or two inches higher than normal.  Why?  The waxed thread has a tendency to melt into the frizzled forelock ends, making it difficult to remove when you unbraid.  Leaving extra hair maintains enough thickness to pop off the hogtie, so you don’t have to try to cut it off (and end up cutting the end of the forelock entirely…not pretty).  Note: when you leave this extra “tail,” it often tufts out beneath the forelock button.  Be sure to “grab it” with your thread and tuck it neatly under the rest of the ball.

As noted in the video, well-endowed forelocks may have to be doubled-under multiple times to achieve a reasonable length for the button.  It takes a bit of practice to figure out how to make it look good– there is definitely not one “right” way, you will develop your own tricks to handle it.  I struggled with forelocks for a long time; they still are my weakness, but I’ve figured out how to conceal it (more or less).  I have some groom friends who under-braid the French braid and it looks REALLY COOL when properly done, but requires a lot of patience and effort to master. 

I’ve accepted the conclusion that many forelock braids often look silly.  Most of them end up as either huge sausage-shapes (from the “Fabios”) or itty bitty pea-sized buttons from the nearly-bald-between-the-ears types.  Thankfully, unless horribly disheveled, most forelock braids are easily overshadowed by a brilliantly braided neck.  In some cultures, it is customary to pull the forelock…which just gives me nightmares, and I simply cannot entertain the idea.  I’ll deal with Fabio, thankyouverymuch.

UNBRAIDING

So, the braiding occasion is over and now it’s time to destroy the artwork you so painfully created.  Unbraiding can be just as important as the braid job itself!  Taking out braids can be deceptively difficult, unless you know how they were put in.  Careless cutting will leave spiky sections that spawn up unruly in your next braiding effort.  Take care to cut WITH the direction of the hair, to limit the risk of cutting mane itself.  Take your time and spare the hair…until after show jumping of your last three-day of the year, before 2 months off, then feel free to HACK AWAY because it’ll grow back by spring season.  Also, do not forget to wet the mane down (before/during the unbraiding process) to avoid CMS — curly mane syndrome.  It just won’t do to be seen with a ‘fro!

OTHER HINTS

Remember back in “A Close Shave” edition of Jog-Up, I severely stressed DO NOT overdo the length of your bridlepath?  Let it grow out!  I promised you I’d tell you how to make it look acceptable.  Well, here’s making good on that promise.

If your “mohawk” bridlepath is fairly short, or a small section, you can probably incorporate it into normal wraps around the first braid behind the ears.  If you have a more serious case of the stick-ups, you may have to get creative. 

I also use this technique to tame the mohawk at the withers, where horses’ manes frequently get frizzed from blankets rubbing.  Some people just shave it off and leave a very large empty space after the last braid.  I prefer to braid to the very last instant of mane– I’m not a fan of cutting, as I have seen some horses develop sores (they NEED some hair for protection from saddle pads and blankets!).  But, you can’t braid frizz that’s barely an inch long.  For dressage, you can probably hide it beneath the saddle pad.  But what about for jogs?

You have a needle and thread: use it!  I tame the mohawk by sewing it down close to the neck, so that it looks neat and tidy.  Begin with a couple stitches/wraps around the beginning of the section, and gradually work your stitches down.  Occasionally, add a “backstitch” (change direction back towards the beginning) for security.  Once you reach the end of the mohawk, finish the thread off by running it through a previous loop a few times, or a twisted half-hitch.  This little bit of “knitting” is NOT very durable unless you get obsessive with your stitching; but it usually only has to stay in for a short trot-up, so it can last that long.  However, this technique allows your horse to look presentable *now,* while allowing the offending section of mane to grow out to look nice in the future.


Happy braiding!

FAQ: Rolex

We get a lot of questions here at EN.  I’m here to answer any and all inquiries, but to save us all the trouble, I thought I’d get a batch of them out of the way today.  With a big 4* event looming upon us, let’s shed some light on the subject.


FAQ:  ROLEX

Q: What is “Rolex?”

A:  The Rolex Kentucky Three-Day Event CCI****, known simply as “Rolex” (never “THE” Rolex, unless you want to sound like a total dweeb), is the USA’s biggest eventing competition, a four-star event.  Riders from across the globe will compete in dressage, cross-country, and show-jumping.

Q:  I thought Rolex was a watch.

A:  It is, and is also the title sponsor of the event for as long as most of us can remember.  The winner of the event wins a Rolex timepiece.

Q:  Do they wear those on cross-country?  Does it have a count-down beeping timer?

A:  No, you’re thinking of the Optimum Time Yellow Watch.  That’s not a Rolex.


Q: Where is Rolex? 

A: Rolex is hosted at the Kentucky Horse Park, located in Lexington, the Horse Capital of The World.

Q:  Isn’t that where some big-deal horse race is, the Derby thing?  Is that what this Rolex is all about?

A:  That is in Louisville, also part of Kentucky, but not to be confused with Lexington.  Rolex has nothing to do with the Derby, except that they both air on NBC.  And they both include horses.

Q:  I saw a sign once that said Ocala, FL was “horse capital of the world.” 

A:  They’re lying.  It’s pretty much undeniable that horses are King in Kentucky.  Go drive around Lexington sometime, you’ll understand.

Q:  I thought Bourbon was king in Kentucky.  Does Rolex serve Mint Juleps?  I like Mint Juleps.

A:  No.  That’s more of a Derby thing.

Q:  When is Rolex?

A:  April 22-25.

Q: Wait.  That’s four days.  Why isn’t it called the Rolex Kentucky FOUR-Day Event?

A: Well, each rider only rides 3 days of competition.  Dressage is spread out over Thursday and Friday.

Q: Is that to keep the judges happy, less total hours cramped in a small box reciting arbitrary numbers?  Or because the hotels and local businesses like an extra day of visitors’ money?

A:  That’s just how it’s done at major three-days.  They are four days long.  There is a perceived advantage to competing dressage on Friday, as some believe judges “save room” on Thursday for lower scores the next day.  This cannot be confirmed nor denied.

Q: OK, so how do you know who wins?

A:  The riders perform a dressage test to give them a starting penalty score.  Then they tackle cross-country, trying to jump clean and fast to avoid additional points.  Lastly, they must complete a show jumping course, where any knockdowns or disobediences also add penalty points.  Lowest score wins.

Q:  So it’s like golf, then.  Lower score is better.  And they compete on green grass.  Do riders earn negative points for going faster?  Like -1 for a birdie/flyer on the 4th fence?

A:  No.  It doesn’t work that way.  Going too fast is often dangerous and ill-advised.


Q:  But it would be cool if they could. 

A:  If you say so. 

Q:  So how long is this golf, I mean, cross-country course?

A: Generally about 30 fences, lasting from 11 to 12 minutes.  At 570mpm, that’s up to 6840m (about 4.3 miles, for the non-metric).  The jumps are spread out all over the park, so you have a lot of ground to cover!

Q:  So, like, spectators have to walk around?  You can’t sit in one spot and view all the thrills & spills?

A:  Well, there are a couple video screens.  But if all you want to do is sit and watch action, go to Bristol and watch NASCAR.  Enjoying the walk around and seeing the jumps up close is part of the fun!

Q: What else is there to do?

A: Bring extra money for the trade fair.  There is lots of shopping to do!

Q: What if it rains?

A:  You get wet.  And Bit of Britain makes a killing on ponchos and wellies.

Q:  Can I enter?  My friend has a pony I rode onceI think it can jump.

A:  No.  Rolex is a four-star event, among the most difficult in the world.  Riders and horses must be highly qualified and experienced at the Advanced level.  It takes years of hard work, talent, training, and preparation.

Q:  Is there such a thing as a five-star event?

A:  Only at Chattahoochee.

Q:  Who’s gonna win?

A:  Your guess is as good as mine!  This event will serve as important preparation for the upcoming World Games, so you know the competitors will bring their very best.  It will certainly be an exciting competition, one you can’t miss!

Can’t make it to Kentucky?  Stay tuned to EN for the latest buzz during Rolex!  We’re still mapping out our master plan of attack, but we promise to bring you the best coverage in our familiar “average, for readers with experience at this level” style.  Until then, Go Eventing! 
 

The Sunday Jog-Up: Tips from a Groom

RadnorJog3-1.jpg 

Do you ever stare in awe at the sleek shiny horses, the glistening brass, perfect braids, and dazzling white marks at a CCI trot up?  Do you ever wonder how they get that way?  (LOTS of hard work is the correct answer!)  Each Sunday morning we will bring you a little insider info on how the big-time grooms manage an upper level event horse.  Feel free to email or comment with specific grooming questions if you have a topic in mind!

Previous entries:  Extreme Makeover: Taming the Tail

Extreme Makeover: Mane Event

Shank You Very Much

Organizational Skills 

                          Know Your Rules

                          Safety First  

                          Odds & Ends

                          What About Tack? Part I , Part II

                          Shining, Shimmering, Splendid

                          A Close Shave

                          Get those white legs white!


EXTREME MAKEOVER: Horse Edition
Phase 3: Button Braids

Tango021.jpg

This is Week 3 of a month-long project in which I will turn an average, “backyard” horse into a creature of beauty.  Or at least, that’s the plan.  I considered using a horse that already looks good, but where’s the fun in that?  I think it’s a better learning experience to start with an “ugly duckling” and turn him into a lovely swan.  I’ve broken the transformation down into four phases, with a new procedure presented each week. 

Phase 1: Mane
Phase 2: Tail
Phase 3: Braids
Phase 4: Finishing touches, including quarter marks.

My innocent victim eager test subject is “Benny,” a six-year-old OTTB.  Benny sustained a suspensory injury last spring, retired from the track, and hasn’t done much in the last year except sit in a field and beat up his pasture mates.  He’s lives out 24/7, is healthy and well-fed, but hasn’t seen a brush or comb until recently.  The change is dramatic!

Benny00.jpg     FILE0715.JPG


PHASE 3: BUTTON BRAIDS

NOTE: due to technical difficulties, this topic will be split into two segments.  Part II will be presented on Wednesday.

What defines an eventer’s turnout?  Some people would say tails — properly pulled and banged.  Most, though, would point to a beautiful braid job.  Tails are somewhat limited to environment and genetics to be successful.  But braiding is all about effort and skill, qualities that displayed by any good groom.  I love braiding; yes, it is tedious, but the results are so worth it!

The classic eventer’s braids are sewn-in with needle and thread, known as “buttons” or simply “sew-ins”.  Of course, anything that makes the horse presentable is allowed: yarn braids (“hunter” style), roached manes, and rubberband braids (another pet peeve of mine).  I learned to braid with yarn, and it is a quick, easy method to show off the horse’s neck.  But the results are largely dependent on the quality of the horse’s mane: thick, uneven manes tend to make ugly braids.  And if the horse rubs?  Forget it, the braids fray, fuzz, and go crooked.  And shavings in the braids are the kiss of death!

I was grooming at a major three-day when a seasoned, big-time groom kindly took me into the world of Real Braiding.  The needle and thread looked like a ton of work, but the results were fabulous: like the mane was roached clean, and little tiny button balls glued in place.  Not a stray hair to be seen.  I was hooked…I wanted MY horse’s crest to look like that!

It takes a bit of practice to master the technique, but once you get it you’ll never go back.  Button braids not only look fantastic, they are extremely durable.  I’ve YET to have a horse rub one out, after 8+ years. No overnight Sleezy required– just brush shavings out, the braid won’t be disturbed.  You can make ugly, uneven manes look acceptable; slightly too-long or too-short, you can make it work.  If you have enough thread and enough patience, almost any mane can look really, really good.

MATERIALS

FILE0689.JPG

  • Needle: preferably a “carpet” needle, with dull tip (no bloody fingers) and large eye for easy threading.  Look in the crafts department of any value store.
  • Thread: waxed thread.  Buy the big roll from Bit of Britain, Harmony (the big blue trailer), or Somerset Saddlery.  Other places carry it too, those are just common at horse shows when you run out.  Yeah, it’s about $30, but it lasts up to 20+ braidings, and it’s good stuff.
      • Waxed thread is AWESOME.  It locks braids tight and has good “grip” on loose hairs.  Black looks good on just about any horse; it’s hardly noticeable on chestnuts, and I’ve used it on pure white manes, too
  • Scissors: buy the really sharp, pointy ones in the crafts department.  Makes taking braids out much easier; just be careful not to cut yourself (I give this warning to anyone who borrows my scissors, and they still bring them back complaining about blood). 
  • Hair clips: I prefer the long-beaked clips, colored plastic ones are easy to find when you drop them.
  • Spray bottle: I’m a believer in QuicBraid, but plain water also works too.

Use anything handy for a stool…an overturned bucket works fine.  Or, you can keep all your braiding supplies in a handy stepstool box.  I keep my essentials in a super snazzy fanny pack; it looks incredibly ridiculous, but who am I to care at 5am.


TECHNIQUE

The key to good braiding is consistency: trying to make each braid identical.  Of course this is impossible, but try to keep them as even as possible in width and thickness (this is why mane pulling is so important!).  You’ll have to compromise sometimes, taking a larger chunk here, smaller chunk there, to even out odd spots within the mane.  With button braids, you can cheat a little bit and leave the tied-up braid looser or tighter to slightly adjust its size to match the rest of them. 

Your sections of mane can vary in width to suit your needs: a delicate neck, with thin mane, looks best with more, smaller braids.  A thick, heavy-set horse usually looks better with fewer, chunky braids.  It also depends on how much time you have and what you’re competing… at an FEI jog, I go all out and put 20+ little perfect braids (and take up to an hour).  At a lower-level horse trial with an 8am ride, I throw in 13 or 14 bigger blobs that I can finish in 25 minutes.  

A good, all-purpose section-width to start at is three fingers (will get about 15-16 braids on an average neck).  “Deluxe” braids are reduced to two-fingers width; that’s what gets you 20+ and takes quite a while.  Whatever width you choose, make sure your sections are divided cleanly: you should see a clear, straight line defining the edges of each braid.  (And this should be free of dandruff– wash those manes!  Whoever perpetuated the myth that a dirty mane is easy to braid…get yourself some QuicBraid and clean your horse up!)

PROCEDURE

This is incredibly difficult to describe in words, so I created a video to help me explain.  I’ll give you a little preview first, though:

Start by pulling about an arms-length of thread; this will do about three or four braids.  I find it tedious to keep re-threading the needle after each braid, so I use a big piece to start with.  Thread the needle– pinch (bite) the end of the waxed thread to flatten it if it won’t fit through the eye.  Pull about 3″ or 4″ through the needle.  Hold needle with teeth.

Use the hair clip to separate your 2- or 3-fingers of hair.  Spray section with liquid, and begin braiding down very tightly.  When you reach the end of the braid (it doesn’t have to be the VERY end, about half-inch will do), insert the needle through the last cross of the braid.  Pull the thread all the way through (this can take effort if you have 2 feet of thread to begin with!), except leaving a little “tail” about half-inch long (or length of your leftover unbraided hair).

Fold the “tail” of thread down so that it becomes “leftover hair.”  Fold leftover hair under to create a little bobbed end.  “Hog-tie” this bobbed end (I obviously watch too much rodeo and calf roping) by wrapping it twice with thread, and spear it with the needle anywhere near the wraps– above, below, through, it doesn’t matter.  Pull thread all the way through again, tightly.  Your braid is now secure!

Pull up” the braid similar to a yarn braid; run the needle up through the base of the braid, close to the crest.  Pull through so that the braid is doubled.  Insert the needle back down through the braid, from crest to doubled-end, keeping it centered.  (This part reminds me of a shish-kabab).  Pull through under the base again; when it doubles now, it begins to take on the “button” or ball shape.

Now, how to get the crest of the neck to look so tight and clean?  “Bring in the sides” of the braid, by looping thread around each side and coming up through the base.  Pull the thread tight!  Take advantage of the grippy wax by grabbing loose hairs within your noose.  Keep wrapping, left side and right side, until you’re happy with the appearance.

If your horse doesn’t rub, or if your braids won’t be in long (a jog, for example), you can simply cut the thread near the braid: no knotting is required.  (See, doncha love waxed thread!)  If you have a known braid-killer, or leaving them in overnight, finish off the braid with a half-hitch (like beginning to tie your shoes).  I’ll give it an extra twist, too, for even more security.  Doing this, I have NEVER had a braid come out unintentionally, despite rubbing or brushing.

My braiding procedure is detailed in the video below:

There are many ways to attain perfect button braids; each groom develops his/her own style, and little tricks to finishing off a braid (please share in comment section!).  It takes a lot of practice and patience to master the technique, but the effort is far worth it. 

REMOVING THE BRAIDS
(video coming Wednesday)

Wet the mane first!  (Just Say No to curly manes!)  Use your super-sharp scissors to cut each side of the braid’s thread.  Then pull the braid down (you may have an underneath-cut to make, depending on how “aggressive” you were with thread).  Given that no knots were made in the “hog-tie,” you can grasp the folded unbraided tail of hair, pull down, and the “hog-tie” will pop right off.  Unwind the braid, comb it out, and done.

I know some people like seam rippers– and they are great for yarn braids.  But waxed thread is tough, and I end up cutting myself, cutting mane, or breaking the stupid blade of the ripper.  That’s why I have a pair of braiding-only scissors which I will defend viciously!

Wednesday I will also cover a few additional tips, like how to tame the frizzy withers or Mowhawk War Bridle Path, and more detail on forelocks.  I’ll also attempt to answer any questions you may have in the Sunday comment section. 

Good luck, and go braiding!   

Lower-Level Event Rider Profile

Once again, it is time to meet a fellow member of our Eventing Nation.  To see previous rider profiles, click on “Rider Profiles” in the Categories sidebar.  These features have been interesting and insightful– I am continually impressed and humbled by our readers as the emails keep pouring in.  You guys rock! 

If you would like to be featured in an upcoming profile, please fill out the Questionnaire and email it to [email protected].  Thanks again to all our participants…there are many profiles to post, and hopefully we will get to yours soon!

FEATURED PROFILE:

Your Name: Lindsay Berreth

Age: 23

Location: Fredericksburg, Va.

Primary horse’s name: Oh So Extreme

Age, breed, pertinent info:
10 y.o., Off the track TB. 17hh, black. He can be somewhat cocky, but I think that’s a good thing. He was raced until he was 7, so he started eventing a little later than most horses, but he’s finding Novice and training quite easy. He is brave and quick-thinking. On the flat, he can sometimes be his own worst enemy because he tries too hard. And he is almost impossible to jump at home because he gets so into it. Once I get to a show, he focuses on the job and jumps much better.

Level currently competing: novice/training

Short term goals this spring/summer:
to compete all season at training level successfully.

Year-end goals:
Maybe a prelim by the end of the year.

Overall goals?
I’d love to complete a long format event. I’ve done prelim and a training 3 day on my other horse, but I’m training Oh So myself, so it would feel like a real accomplishment. My trainer thinks he’s got the talent to go to the upper levels. He’s brave and loves to run and jump.

What’s the best thing you’ve learned recently?
Oh So is the first horse I’ve trained by myself, and through the help of my trainer, Lisa Reid, I’ve realized that you have to take your time introducing a horse to something, especially jumping. We’ve made him feel like there is nothing in the world he can’t jump, by taking our time with him and getting the basics down correctly. He’ll jump anything for me now, he’s so brave. Even if he’s unsure of a spooky fence, I feel like he’s saying “Ok mom, I’ll try it, even though I’m not so sure”.

Our strength is cross country for sure. As I said before, he is bold and fast. He’s got that TB mentality. You can’t tell him what to do, you have to ask and he’ll give you everything he’s got. Our weakness is dressage, only because he has a tendency to get tense. I’m learning to manage it through stretching. He’s so tall and has a huge neck and withers. When his head is up like a periscope, he is taking everything in and letting it get to him. When he’s stretching, it puts him in a better place mentally and I can “keep a lid” on him.

Favorite eventing moment/story? 
I’ve been to Rolex a few times and most of the major events on the East Coast. It’s always fun to watch the greats go. Personally, I’d say my 2006 season at training/prelim was memorable. I was riding my other horse, What the Heck. He is an old campaigner, having gone advance and done long formats before I had him. We had just switched to my current trainer. He is a difficult show jumper, very careless. That entire season at training level, I think we only had a couple of rails down. More clear rounds than not. We did the Waredaca Training 3-day that fall and were leading until show jumping, where we had a rail and finished second. The next weekend we won or prelim at Lexington. We also did AECs that year and were 4th going into stadium, but had 2 rails.

Link to blog or website, if applicable:
I wrote this blog about my other horse.

Photo(s) or videos:  Link to photo album    Lindsay has lots of LOVELY pics, check them out!


Volume 23 * Number Two

An old friend returned today, one that I’ve been missing for quite some time.  Oh, how we used to spend long drives together, studying dressage tests and planning our show season.  Who is this dear old friend?

My paper Omnibus.

I was like a kid at Christmas today, gathering my mail from the post box.  I was excited to find a plain brown envelope from the USEA, sufficiently thick and heavy.  I tore open the wrapping, and my eyes beheld a bright, shiny, crisp booklet of treasures.  THE SUMMER OMNIBUS!  In print!  In my hot little hands to have, hold, and cherish!  I’m in love again!

I know, the information has been online this whole time.  But it’s just not the same.  Something about the disorganized chaos of events strung together in an endless scrolling hyperlink list just made life more complicated.  And I’m a rather tech-savvy individual; surely I could navigate the USEA site with relative ease?  And yet, I can’t.  I know, the whole thing is online and I can print it out, or copy/paste it into an Excel document.  But it’s just not THE SAME as having that nifty book with the Bit Of Britain, Nutrena, and CoverAll ads, and never enough forms in the back.  What am I to do when I’m on the road, out xc schooling, or otherwise separated from an internet-linked computer?  (I do have a phone with limited internet capabilities– but the USEA site is, um, waaaay beyond its comprehension.  And then there’s that whole texting-while-driving thing, no thanks.) 

So, this year, despite all the penny-pinching, I bit the bullet.  I forked over the cash (I think it was a whopping $12) and ordered the REAL Omnibus.  And now that it’s here, I would have paid twice that!  Why was I so slow on the uptake?  Why didn’t I order it sooner?  There is peace in my competition schedule world again, simply from flipping the hard-copy pages of a 300-page black-and-white book. 

It is such a relief to have it again, riding shotgun on the dash of my truck, just an arms-length away when I need it most (driving home after a good/bad event and needing to make last-minute competition adjustments).  Once again I have access to precious information, like secretaries’ phone numbers and email, future events listed by date/level, and Area Officials and Coordinators contact listings (um, how often does anybody really need that?).  The pages will soon be crinkled and dog-eared, the cover eventually ripped off, and notes written all over the margins.  It will be my Velveteen Rabbit.  (Only I don’t plan to infect it with scarlet fever and burn it.) 

I know I’m not the only one who has struggled to enter events without my omnipresent compass.  Don’t get me wrong– I LOVE evententries.com, and it is a godsend– but there’s something about having the information in real life, in actual physical Einstein-ian organic matter, that cyberspace just can’t replace.  I urge you to save some electrons…cut down some trees and buy yourself some happiness: a paper Omnibus.  (You can recycle it later.)

I’m blissfully happy right now.  And you know what’s even better?  I pre-ordered the Fall one, too.  Santa comes twice this year!   

Best of Craigslist — Life is Random

wtf-pics-dial-a-llama

It’s time to dig into the dregs of my Craigslist box of absurdity.  Today’s lineup is like a box of chocolates: you never know what you’re gonna get.  Goats, killer llama, tattoos…the internet is indeed a vast, strange place.  If you stumble across a particularly good ad, submit it to [email protected] and it might make the next BoC! 

————————- 

In this grand World Wide Web invented by Al Gore, there happens a unique, bizarre bazaar phenomenon of Craigslist.  Part eBay, part flea market, part redneck yard sale, Craigslist is a free-for-all classified site where good deals can be found in any category from cars to dishwashers to tarantulas .  It’s like treasure hunting from your keyboard, and you never quite know what you’ll find.  Craigslist frequently has a few equine-related listings; the quality and content of which may vary widely.  Thus, for your entertainment, we now bring you THE BEST OF CRAIGSLIST


If you think Craigslist is only for equids…


LAND CLEARING GOATS (starting at $75.  Alachua County)

One Goat, One Acre per year. Clearing, maintaining and, bonus, Fertilizer. Sell surplus goats for extra cash. They Eat Weeds and improve pastures. Goats can be used for Agricultural Exemption. They trim trees up and maintain making it easy to maneuver and see in the woods. Goats are easy keepers, sociable, good companions for people and animals. If you like they can be milked and the milk used to make cheese, yogurt or ice cream.
We have percentage Boer GOATS FOR SALE $75.00 and up. Gainesville Fl.

  • Bonus, fertilizer?  Sell surplus goats?  Somehow I don’t see this as being a good idea.


Llama – Guard Purposes Only!

Beautiful fully intacked red & white male Lama. For Guard Purposes Only! Lugie knows his job; and, does not differentiate whether he removes a varmit, a human, or a vehicle from the pasture he is protecting. Extremely protective of ‘his’ designated area. Dangerous and unpredictable; absolutely not for the novice owner. Great guard for goat, sheep, or cattle herd. No problems with other animals that belong where he is located; just everything and anything else intruding. Halter-broke, will lead, will come when called. I cannot stress enough how dangerous this animal can be . . . he almost killed me! Would prefer he not go to anyone in the Tidewater area; would be great in a mountain pasture situation, where coyotes are a problem. Make me an offer I cann’t refuse.       Chesapeake, VA

  • Um, perhaps the animal might be less dangerous if he were “un-tacked?”  And what kind of offers is he going to refuse for an animal that tried to kill him?  (thanks to one of our loyal readers for emailing this listing to us!) 

More crazy trade deals…

Want to trade tattoo work for horse/by professional artist


Date: 2010-02-27, 11:20AM EST


I’m looking for a horse or two for the wife. Weanlings (6 months and up), yearlings or broke adult gelding or mare. In return, I’m a professional tattoo artist and can tattoo in exchange for the horse or horses. I have flash art to choose from or you pick your own tattoo, sleeves or separate tattoos you tell me. I do have a portfolio to review. Can email photos of some of my work to you. Safe, sterile, bright colors and professional attitude have over 15 years experience not some young amateur.

Email me with picture and description of horse and temperment.

Thanks

  • Who’d have thought tattoo ink could be valuable currency?  Only on Craigslist.

Im looking to trade miniature horses for classic cars – $10 (somerset ky )


Date: 2010-03-05, 6:34PM EST


I have about 250 miniature horses all have papers. Im willing to trade on about anything. you can email me for more info.

  • 250 minis?!  That seems a bit excessive.  Perhaps a little hoarding disorder, maybe?  Or is this a “mini mill?”  How many minis would you want for a ’72 Mustang?

Gender identity crises…

!~!~!~!~!HORSE!~!~!~!~! (OWSLEY/BOONEVILLE)

Date: 2010-03-25, 11:07AM EDT

think he may be a gelding, not sure, no papers, but he is 14-15 hands high, chestnut color with flax color mane, about 7 years old, broken to ride if u know how to ride.

  • “Not sure”?  Either there are parts…or there aren’t.  Methinks that’s kind of important to know before you acquire a horse.  


two cheap horses make offer/trade

Date: 2010-02-26, 1:11PM EST

i have two standerd breed horses for sale one mare and one male! the mare is broke but has no been rode for a few years and the male is not broke and he is being called a male instead of a stud because i don’t know if he has been cut or not i can’t see a sack but he is supposed to be a stud both horses are real gental i can walk upto eighter one in the pasture or the yard both horses will stat behind one strand of barb wire! i know this because a few weeks ago some of my fence post rotted off and a whole section of fence fell down and they never offered to come out! i will sell these two horses real cheap but i will not give them away for the right price i will include a new saddle never been on a horse and a new bridle and some old tack i have! so make me an offer! i’m only selling these two horses because i fell off a load of logs afew years back and messed my back up and cant ride over 10 minutes at atime! i keep the horses hopeing to get better so i could ride them but after 2 years i know i can’t! they must go to a good home will sell seperate! I WILL TRADE FOR ALMOST ANYTHING SO LET ME KNOW WHAT YOU HAVE! i can also deliver the horse for a fee!

  • Well, at least he’s sure one’s male, despite the lack of visible “sack.”  Good to know that they stay (I’m assuming “stat” is a typo) behind a strand of barbed wire, and won’t wander when your rotten fence falls down.  Yikes.

Videos from The Fork

Wow, you have to love this high-speed information age!  Cross-country videos from the Fork are already posted on YouTube.  It’s almost as good as being there…enjoy!

Great recovery by Missy Miller (intermediate)
Awesome video from buzzterbrown, as usual.  (Hat tip to karimarie26 in the comment section, thanks for the link!)

Peter Atkins with the helmet cam riding HJ Hampton (Henry).  What a nice, confident trip they had around the Advanced course.  I love hearing Peter’s encouragement!  And John wasn’t kidding when he said there were a lot of corners out there…!


[John’s update: I’ve just arrived home from The Fork, and I’m about to implement a lesson I learned early on with Eventing Nation: don’t write for a website if you’re too tired to say the alphabet.  Besides, if you thought my jokes were bad when I am caught up on sleep… Anywho, we’ll have Monday N&N and much more from The Fork by lunchtime.]
3D3W took some video interviews at The Fork, visit 3D3W for more.  Will talks about preparing for Rolex…

…and David explains why eventers are cool.

The Sunday Jog-Up: Tips from a Groom

RadnorJog3-1.jpg 

Do you ever stare in awe at the sleek shiny horses, the glistening brass, perfect braids, and dazzling white marks at a CCI trot up?  Do you ever wonder how they get that way?  (LOTS of hard work is the correct answer!)  Each Sunday morning we will bring you a little insider info on how the big-time grooms manage an upper level event horse.  Feel free to email or comment with specific grooming questions if you have a topic in mind!

Previous entries:  Extreme Makeover: Mane Event

Shank You Very Much

Organizational Skills 

Know Your Rules

                          Safety First  

                          Odds & Ends

                          What About Tack? Part I , Part II

                          Shining, Shimmering, Splendid

                          A Close Shave

                          Get those white legs white!


EXTREME MAKEOVER: Horse Edition
Phase 2: Taming the Tail

    BennyTail before.jpg    BennyTail after.jpg

This is Week 2 of a month-long project in which I will turn an average, “backyard” horse into a creature of beauty.  Or at least, that’s the plan.  I considered using a horse that already looks good, but where’s the fun in that?  I think it’s a better learning experience to start with an “ugly duckling” and turn him into a lovely swan.  I’ve broken the transformation down into four phases, with a new procedure presented each week. 

Phase 1: Mane
Phase 2: Tail
Phase 3: Braids
Phase 4: Finishing touches, including quarter marks.

My innocent victim eager test subject is “Benny,” a six-year-old OTTB.  Benny sustained a suspensory injury last spring, retired from the track, and hasn’t done much in the last year except sit in a field and beat up his pasture mates.  He’s lives out 24/7, is healthy and well-fed, but hasn’t seen a brush or comb until recently.  The change is dramatic!

Benny00.jpg   Benny1.jpg


PHASE 2: TAMING THE TAIL

When Benny arrived almost a year ago, his tail was nothing special.  Kinda ratty, a little wispy, falling somewhere below his hocks.  After eleven months of neglect, it grew to a nice thickness, with the longest strands all the way down to his pasterns.  I am a BIG believer in “leave that tail alone.”  Daily attention does more harm than good.  I only mess with tails for shows, or if they become entangled with burrs.  If you want a nice, thick tail… ignore it!  (note: tail bags are another segment entirely– I have used them successfully, but only in necessary situations, like grays).

Also, come to terms with the fact that your horse has a limit to what his tail will be– it’s called “genetic potential,” and nothing you do can give a rat-tailed Appy the double-thick tail of a draft cross.  There is no magic potion or secret procedure to produce instant results, short of a fake tail (eww).  Sometimes you just have to accept that your horse has a bad tail, and learn to appreciate it for what it is.  But that doesn’t mean you won’t stare jealously at your friend’s horse’s luscious tail, as she hacks at it with a brush ripping out handfulls, and the thing is so long and full no one can notice.  Meanwhile, you can still obsess (I mean, lovingly cherish every single hair) over your horse’s tail to make it all that it can be.  

Benny’s tail treatment began with a thorough washing.  Before you wet it down, shake out any bedding or foreign material.  As a rule, I use dish soap for all my equine washing needs, unless a particular situation (skin disease, whiteness) dictates otherwise.  Tails can be tough to lather, but the dish soap is cheap so use it generously.  Scrub the tailbone to remove any loose skin or dandruff.  Rinse well, especially around the dock (dried soap can be itchy).  Unless I’m washing the tail every day (sigh, gray mares), I follow up the shampooing with a conditioner.  Anything on sale, cheap, will work.  Apple-scented?  Sure.  Squirt a ribbon of conditioner down the length of the tail, below the tailbone, and work it in well.  Leave it on for a few minutes (I like to use this time to scrub the horse’s face, or white socks), and rinse again. 

The conditioning step is optional, but it seems to help offset the drying effect of washing.  After the tail is clean and conditioned, towel it dry and spray liberally with Showsheen.  Lots of Showsheen, lots and lots on the skirt of the tail (not on the upper tailbone).  I don’t use it daily, only after show baths, so I don’t feel guilty about “residue buildup” or any of that.  When you have a neglected tail full of tangles, you need all the help you can get!  Now, let the tail DRY COMPLETELY.

Don’t even bother trying to untangle a wet tail.  When damp, the hair tends to clump together and individual strands become stretchy, but fragile.  Surely you have something else to do (braid? clean tack?) while the tail returns to its normal dry characteristics.

OK, so the tail is dry.  Get the brush and have at it, right?  WRONG!  Pick through the tail by hand, strand-by-strand as necessary.  Brushes and combs will rip hair out, even if you’re careful.  But using your fingers, you can work through the whole tail without damaging a single hair.  It can take a while, but you will see the results over time.  I like to squeeze a bit of Cowboy Magic on my fingers, and distribute it throughout the tail as I go.  It helps the tangles slip out, and adds a nice shine. 

How do I hand-pick a tail?  Hold all of it in one hand, let’s say your left.  Squeeze a bit of Cowboy Magic on to your thumb/index/middle fingers of both hands.  Starting at the top, use the fingers on your right hand to separate strands of hair from the whole tail in your left.  Pull the entire strand of hair free from your left hand, and let it fall freely.  Switch hands to switch sides; the untangled hair hangs down freely, the tangled mess remains held in one hand.  Work down the tailbone, gently separating tangles as they occur.  Picking through the tail often makes it look a bit fuller, as well as saving every precious strand.  Once it is completely tangle-free, you may then comb or brush it gently (start from the bottom) to smooth it out. 

BennyTail pick.jpg
(note: you probably shouldn’t stand directly behind the horse;
I had to move over to get better light for the photos)

At this stage, it’s time to cut or “bang” the bottom of the tail.  Some disciplines (hunters) prefer the “natural” look, but scraggly-ends are not appropriate on an eventer!  Hold the tail in working position, stick a comb horizontally under the dock to hold it out a little bit.  I know you want to preserve as much precious length as possible, but generally a fuller, shorter tail looks better than a longer, wispy one.  Some people traditionally bang the tail a hands-width below the hocks…but that’s a bit extreme for me.  When possible, I love the tail to fall right at the fetlocks; though I’ll end it wherever it looks best.  In Benny’s case, it was about halfway down the cannon bone.  I usually bang the tail a little before each event, taking off about an inch or so to neaten up the ends.

BennyTail cut.jpg 
1.  Near the fetlocks is where I           2.  Some people go higher, a          3.  Benny’s is about halfway
     like to cut it.                                    hands-width below the hocks.           in between.

So now we have a clean, tangle-less, banged tail.  You could stop here, and have a nice look.  Or, you can go that last step and make it a TRULY great tail:

Pulling the Tail

Most (I daresay all) upper level horses have a “manicured” dock, pulled or trimmed along the sides to enhance the hindquarters.  It is most traditional, and in my opinion much better, to pull the tail instead of shaving it with clippers.  I hate hate hate shaved tails– most of them look like bushy toilet brushes.  And they grow out to be even worse!  Once you clip, you ALWAYS have to clip…trying to pull a clipped tail is incredibly difficult and really not fun.  I have seen only about 5 shaved tails in my lifetime that were a visual improvement over a natural tail.  If the horse simply WILL NOT tolerate pulling, I leave the tail alone or (if you hold a gun to my head) braid it.  Also, there are some horses that simply DO NOT look good with a pulled tail– my old one-star horse has a very fat, wide tailbone and looks really silly without full hair.

Since pulling is a tedious process, and requires upkeep, I generally don’t bother with it until the horse is going Prelim.  Why?  1. Lower-level horses may not have much “hindquarters” to show off, and 2. there’s only so much time available and I’d rather spend it on the upper level horses.  When I do have the time, I do like to put in the effort for any horse to make him look better.  Most pulled tails will need a little “touching up” pulling once a month, or before events– pull anything that sticks out obtrusively, or longer than an inch or so. 

Now, the actual pulling process.  First, you must envision what your final result will look like: picture the tail as a long, skinny box.  You will be pulling the sides of the box, NOT the top.  The actual length and shape will be determined by your horse’s conformation; it should taper off and end somewhere below the point of buttock when viewed from the side.  Viewed from behind, it may have a slight hourglass shape, following the contour of the butt cheeks.

With a mental image in mind, begin pulling (again, I like to use latex gloves for grip).  Hold the tailbone with one hand, and pull with the other.  Take only a few hairs at a time, and stand to the side as the horse may kick!  Usually they don’t blast you with the first tug; they’ll get antsy, dancing sideways, and flinching as you continue to pull…those are your warning signs!  My mare is a kicker (it’s her default pissed-off response to anything in general), but she tolerates the pulling process just fine.  I will give a firm slap if the horse threatens to kick and lifts a hind foot in my direction.  Often, the horse settles a bit as you go; the nerves dull a bit and the horse gets used to it.  Benny minded the mane pulling a lot more than his tail.  Some horses will not stand to do the whole tail at once– that’s fine, work on it a little each day, or every other day as you can.  It may help to have someone hold the horse, distract it with food/hay, or resort to a twitch if necessary.

Work down both sides as you go, checking often to keep the sides evenly matched.  Switch hands or take breaks when you get tired or weak-fingered.  Sometimes wetting your fingers (spit on them) gives extra grip if you find the hair slippery.  I find that horses seem to appreciate working quickly, in a fast rhythm.  It’s sort of like pulling a bandaid off– rip it quick and it’s less painful than peeling it back slowly.  Speaking of bandaids… you will probably notice the dock bleeding a little from the missing hair.  This is normal.  It’s not pleasant, but it’s part of the process.  Don’t worry about it; manes bleed too, you just don’t notice it as much.

TailSeries.jpg 

1.  The bushy, unpulled tail.
2.  Stand off to the side and take only a few hairs!
3.  Hold the tail with one hand, work both sides evenly.
4.  Work in small sections beginning at the top.
5.  See the section missing?  Progress in small steps.
6.  The section is getting bigger, nearly halfway done.
7.  Checking the other side to see if it’s even. 
8.  Nearly finished, from the side.  Yes, it’s bald!
9.  Finished tail, from the rear.  Looks great!

Notice in these photos, how the tail is being contoured to complement Benny’s hindquarters:

BennyTail001.jpg    BennyTail01.jpg     BennyTail profile.jpg

1. Working toward tapering the end.                  2.  Slight hourglass design.               3.  Lovely shape to follow the haunch conformation.

You probably noticed that the tail is BALD along the sides.  This is not the finished product, but it is your goal after Day 1.  Over the next couple weeks, the hair will regrow and fill in neatly, and will have the appearance you are accustomed to seeing at shows.  During the regrowing process, it helps to keep the tail bandaged as much as possible (several hours a day while the horse is stalled).  Keeping a wrap on it will train the hair to grow smoothly down the bone, instead of straight out bushy.  Even just wrapping the tail while you groom every day helps a little bit.  Also, wrap while trailering, and for about an hour before you compete at shows to lay the hair properly.  Use an Ace bandage, knitted track wrap, or specific “tail bandage” if you prefer.  I know Pony Club has reservations about Ace bandages (they stretch too much), but they are extremely common and are preferred by almost everybody.  If it doesn’t have velcro, tie a knot in one end.  You can dunk it in a water bucket to dampen it, which helps train the hair and help grip a little.  Be very careful not to wrap too tightly!  New bandages, especially, are easy to over-stretch, so use them delicately.  If you notice the horse rubbing his tail wrap, loosen it!  It’s far better to have the wrap fall off, than for the horse to lose circulation (and possibly all his hair!) in his tail. 

BennyTail Wrap.jpg

To wrap the tail:
1.  Throw it over your shoulder, and begin the bandage with a couple wraps at the very tip top.
2.  You can keep wrapping straight down, overlapping about 2/3 width.  Or, as in the photo, use a crossing/herringbone pattern: one wrap down, one wrap angled up, to help prevent the bandage from slipping down.
3.  Secure it by velcro-ing, or tucking the knotted-end under a layer.  Be sure to finish on the top of the tail, not underneath or on the sides– that would be uncomfortable!
4.  The finished wrap. 
5.  The wrap should extend down the tailbone beyond the pulled portion.

My helper and I were simply shocked at Benny’s transformation when his tail was finished.  We stood back, looked at each other, and she said, “OMG, Benny has a BUTT!!”  It really did accentuate his hind end, and make his whole appearance more polished.  This is one instance where you can say with a happy smile, “it really DOES make his butt look big!”

BennyTail finished.jpg 
Look!  Benny has a butt!

Bracket Battle of Event Horses: OFFICIAL RESULTS

The votes are in… hanging chads have been inspected, absentee ballots cast, and unless Al Gore strongly lobbies for a re-count, we are calling this thing official.  May I have the envelope please…

Drumroll…(struggling to break the sealed tape)

The 2010 Eventing Nation Bracket Battle of Event Horses Champion is…

WINSOME ADANTE.  (cue celebratory music, camera pans to ecstatic Kim Severson, hugs from the O’Connors, and Mark Todd clapping politely with a fake smile of appreciation).

It was an extremely tough battle, and for the first 20 hours it seemed Charisma would pull it off.  Dan earned 53% of the 712 votes, and despite commenters’ protests, Charisma came up just short. (no pun intended, Podge!)  Congratulations to Winsome Adante, a worthy champion.  And let’s give a round of applause to our runner-up, who seemed destined to win…but alas, it wasn’t meant to be.

Just so you know, I had another results post all written up at 10pm March 31, when Podge was winning at 54%.  I basically declared Charisma the champion, thanked Winsome Adante for participating and gave him his parting gifts.  I was stunned the next morning when Dan fought back to take the lead, and then steadfastly retained it despite the fanatic support for Podge.  As with anything, it ain’t over till it’s over! 

Thanks to all who voted, I hope you enjoyed the Bracket Battle.  It was fun remembering all these great horses, it really puts our sport in perspective through the years.  I know we left some awesome horses off the list, so we’ll try to get them next year. 

Bracket.JPG 

Go Eventing!